Staff Guide — Editing Docs via GitHub
This guide covers everything you need to edit the Tersus documentation site using GitHub's built-in web editor. No software to install, no technical background required beyond basic Markdown.
1. Overview
What is GitHub?
GitHub is a website that stores files and tracks every change ever made to them. Think of it like Google Drive, but with a full history of every edit — who changed what, when, and what the file looked like before. The Tersus documentation source files live in a GitHub repository (a project folder) at:
https://github.com/tersus-gnss/tersus-docs
You edit files directly in the browser. GitHub saves your changes and records them in the history.
How edits reach the live site
The workflow uses pull requests (PRs) for quality control:
You edit a file on GitHub
        ↓
GitHub creates a branch + pull request (PR)
        ↓
Vercel builds a preview of your changes (~2 minutes)
        ↓
A reviewer approves the PR and merges it
        ↓
Live site at docs.tersus-gnss.com updates
This ensures someone reviews changes before they go live — catching formatting errors, broken images, or accidental deletions before they reach the public site.
What you CAN edit
- Any
.mdfile inside thedocs/folder - Text content, headings, tables, lists, images
- Fixing typos, updating specs, adding new sections within an existing page
What you should NOT touch
- The frontmatter fields
id:andsidebar_position:at the top of every file - The file
sidebars.ts— controls the left-hand navigation - The file
docusaurus.config.ts— site-wide configuration - Anything inside the
src/folder - Renaming or moving files
These are covered in detail in Section 6.
2. Setup (One-Time)
Create a GitHub account
- Go to https://github.com
- Click Sign up
- Follow the prompts — use your work email address
- Verify your email when GitHub sends the confirmation
Get access to the repository
Once your account is created, send your GitHub username to the site administrator. They will add you to the tersus-gnss organisation with write access to the tersus-docs repository.
You will receive an invitation email from GitHub. Accept it by clicking the link in that email. Until you accept, you will not be able to make edits.
Create a Vercel account (for preview deployments)
The docs site is deployed via Vercel. To ensure your pull requests trigger preview builds:
- Go to https://vercel.com/signup
- Sign up using your GitHub account (click "Continue with GitHub")
- That's it — Vercel will automatically recognize you as a contributor when you open PRs
If you skip this step, your PRs may show "Blocked" deployment status. Ask the admin to approve you in Vercel team settings.
Bookmark the repository
Navigate to https://github.com/tersus-gnss/tersus-docs and bookmark it in your browser. This is your home base — from here you can reach any file in the docs.
Also bookmark https://docs.tersus-gnss.com so you can quickly check how your changes look on the live site after they deploy.
3. Finding the Right File
There are two ways to locate the file you want to edit.
Method 1 — "Edit this page" link (fastest)
Every page on the live docs site has an Edit this page link at the very bottom of the content. Clicking it takes you directly to that file on GitHub, already in the right location.
┌─────────────────────────────────────────────────────────────┐
│                                                             │
│  ... end of page content ...                                │
│                                                             │
│  ─────────────────────────────────────────────────────────  │
│                                                             │
│  Edit this page  |  Last updated: 3 days ago                │
│                                                             │
└─────────────────────────────────────────────────────────────┘
This is the recommended method. Use it whenever you arrive at a page you need to edit.
Method 2 — Navigating the GitHub file tree
If you need to find a file without starting from the live site:
- Go to https://github.com/tersus-gnss/tersus-docs
- Click into the
docusaurusfolder, thendocs - Browse the folder structure to find your file
Folder structure
The docs/ folder is organised by product category. The structure looks like this:
docs/
├── geosystems/
│   ├── gnss-receivers/
│   │   ├── luka/
│   │   │   ├── index.md                    ← product overview page
│   │   │   ├── introduction.md
│   │   │   ├── technical-specifications.md
│   │   │   └── general-operations.md
│   │   └── ts30/
│   │       └── index.md
│   └── mobile-mapping/
│       └── mvp-s2/
│           └── index.md
└── autonomy/
    └── oem-modules/
        └── mx206/
            ├── index.md
            ├── hardware-introduction.md
            └── hardware-design.md
The URL of the live page mirrors the folder path. For example:
docs/geosystems/gnss-receivers/luka/introduction.md- →
https://docs.tersus-gnss.com/geosystems/gnss-receivers/luka/introduction
If you are unsure which file corresponds to the page you want to edit, use the Edit this page link at the bottom of the live page — it removes all guesswork.
4. Making an Edit — Step by Step
Step 1: Open the file and click the pencil icon
Once you have navigated to the correct file on GitHub, you will see the file contents displayed with a toolbar above it. Click the pencil icon (highlighted below) on the right side of that toolbar to open the editor.
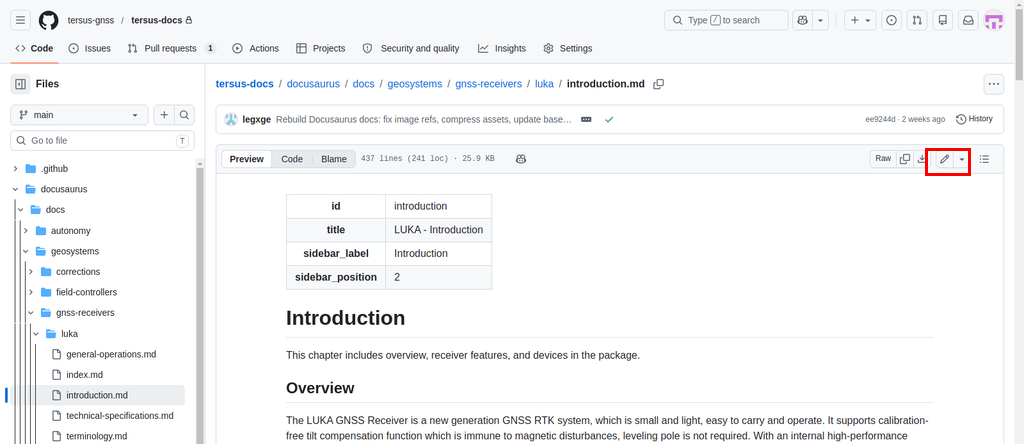
If you do not see the pencil icon, you are either not logged in to GitHub or your account has not been granted write access yet. Contact the administrator.
Step 2: Edit in the text editor
GitHub opens a plain text editor. The file content is fully editable. The frontmatter block at the top (the section between --- and ---) should generally be left alone — scroll past it and make your changes in the body of the document.
┌─────────────────────────────────────────────────────────────┐
│  Edit file    Preview                                       │
├─────────────────────────────────────────────────────────────┤
│  ---                                                        │
│  id: introduction                                           │
│  title: LUKA - Introduction          ← do not edit these   │
│  sidebar_label: Introduction                                │
│  sidebar_position: 2                                        │
│  ---                                                        │
│                                                             │
│  # Introduction                      ← safe to edit below  │
│                                                             │
│  This chapter includes overview...                          │
│  |                                   ← cursor here         │
└─────────────────────────────────────────────────────────────┘
Make your changes using Markdown formatting. The Markdown Reference Card in the next section covers all the formatting you will commonly need.
Step 3: Preview your changes
Before saving, click the Preview tab at the top of the editor to see a rough render of your Markdown. This catches most formatting errors — broken tables, missing list dashes, unclosed bold markers, and so on.
┌─────────────────────────────────────────────────────────────┐
│  Edit file    Preview                                       │
├─────────────────────────────────────────────────────────────┤
│                                                             │
│  Introduction                                               │
│  ────────────                                               │
│                                                             │
│  This chapter includes overview, receiver features,         │
│  and devices in the package.                                │
│                                                             │
│  Overview                                                   │
│  ────────                                                   │
│                                                             │
│  The LUKA GNSS Receiver is a new generation...              │
│                                                             │
└─────────────────────────────────────────────────────────────┘
GitHub's preview does not render Docusaurus-specific features like :::note callout boxes or some table styles. These will look correct on the live site even if they appear as raw text in the preview.
Step 4: Commit your changes
When you are satisfied with your edits, scroll down below the editor. You will see the Commit changes panel.
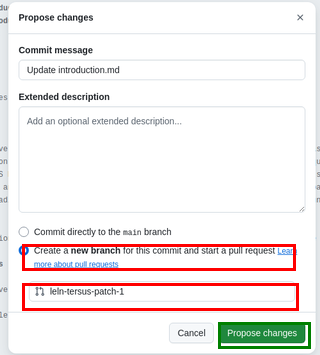
Commit message: Write a short, descriptive summary of what you changed. Examples of good messages:
Update LUKA introduction — corrected battery life to 10 hoursFix typo in TS30 technical specificationsAdd new antenna compatibility table to MX206 overview
Keep it under 72 characters. This message appears in the file history and helps you (and others) understand what changed and why.
Branch selection: Select Create a new branch for this commit and start a pull request. GitHub will suggest a branch name like qiu0720-qq-patch-1 — this is fine, or you can rename it to something descriptive like docs/update-luka-specs.
Click Propose changes to continue.
Step 5: Create the pull request
After clicking "Propose changes", GitHub takes you to the Open a pull request page:
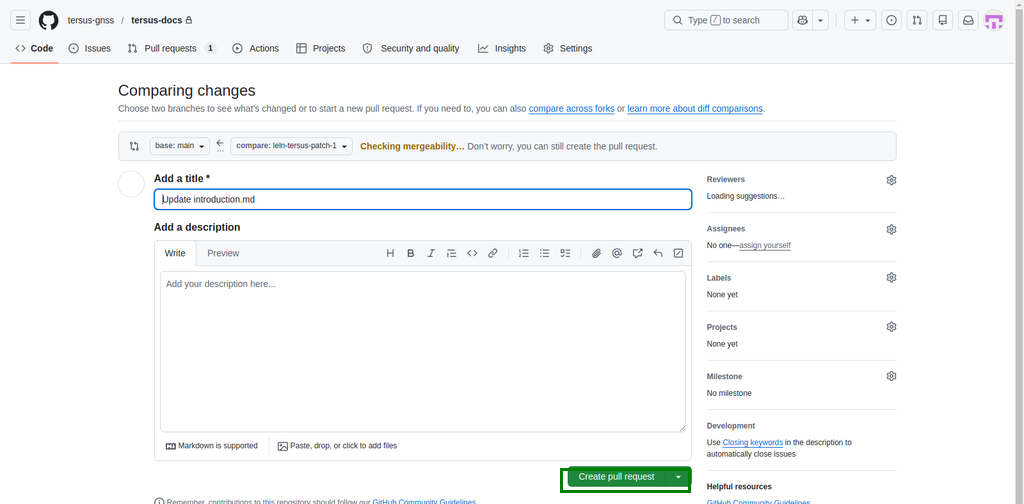
- The title is pre-filled with your commit message — this is fine
- Optionally add a description explaining what you changed and why
- Click Create pull request (green button at bottom)
That's it! Your changes are now in a pull request waiting for review.
Step 5b: Edit additional files on the same branch (optional)
If you need to edit more than one file as part of the same change (e.g. updating specs across two product pages, or fixing the same typo in several files), you do not need to create a new branch or PR for each file. Instead, add more commits to the branch you just created:
- Go back to the repository: https://github.com/tersus-gnss/tersus-docs
- Use the branch dropdown (top-left, where it says
main) and switch to the branch you just created (e.g.qiu0720-qq-patch-1or whatever name you chose) - Navigate to the next file you want to edit and click the pencil icon
- Make your changes
- In the Commit changes dialog, select "Commit directly to the
<your-branch-name>branch" - Click Commit changes
In the commit dialog, make sure the first option is selected — "Commit directly to the <your-branch-name> branch" — then click Commit changes.
The new commit automatically appears in your existing pull request — no need to open a second PR. The preview deployment will also update automatically.
Repeat for as many files as you need. All your edits stay grouped in one PR for a single review.
Remember to switch branches first. If you see main in the branch dropdown, you are on the wrong branch. Always confirm you see your branch name before editing.
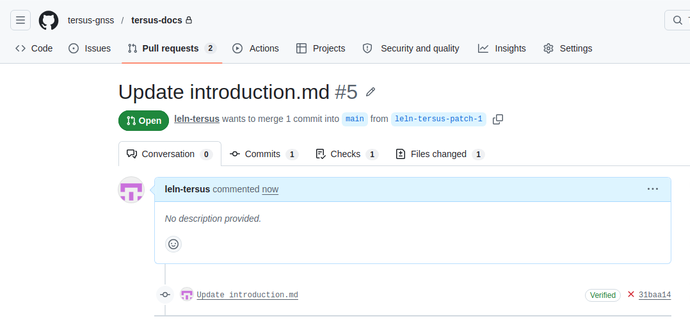
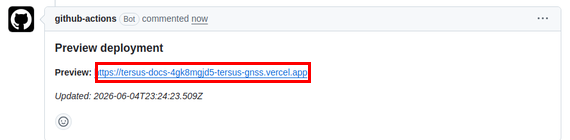
Step 6: Check the preview
Within 2–3 minutes of creating the PR, a bot will post a comment on your PR with a preview link. Click the link to see exactly how your changes will look on the live site before they are approved.
If something looks wrong, you can push more edits to the same PR branch (see Step 5b above).
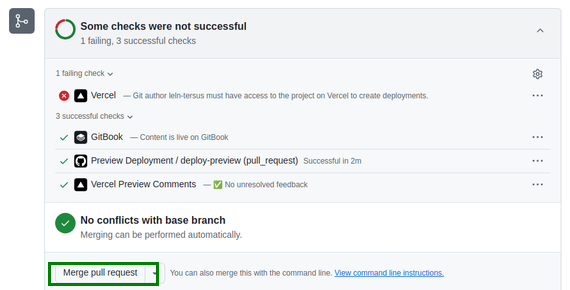
Step 7: Wait for approval and merge
A reviewer (admin or designated approver) will:
- Review your changes in the PR
- Approve and merge the PR into
main - The live site updates automatically within ~2 minutes of merge
You'll receive a GitHub notification when your PR is merged.
If your PR has been waiting more than a day without review, message the team admin to check on it.
5. Markdown Reference Card
Core formatting
| What you want | Markdown syntax | How it renders |
|---|---|---|
| Heading 2 | ## My Heading | Large section heading |
| Heading 3 | ### Sub-heading | Smaller subsection heading |
| Heading 4 | #### Minor heading | Small inline heading |
| Bold text | **bold** | bold |
| Italic text | *italic* | italic |
| Bold + italic | ***both*** | both |
| Inline code | `code` | code |
| Horizontal rule | --- | Divider line |
| Link | [text](https://example.com) | Clickable link |
| Internal link | [text](./other-page) | Link to another doc page |
| Image |  | Embedded image (see Section 7) |
Lists
Numbered list:
1. First item
2. Second item
3. Third item
Bullet list:
- First item
- Second item
- Third item
Always leave a blank line before the first item in a list, otherwise the list runs into the paragraph above it and renders as plain text.
Code blocks
Wrap code or technical content in triple backticks. Specify the language after the opening backticks for syntax highlighting:
```text
Plain text block — use for terminal output, file paths, etc.
```

```bash
# Shell command example
npm run build
```
Tables
Every table needs a header row, a separator row (dashes and pipes), and at least one data row.
| Column 1 | Column 2 | Column 3 |
|---|---|---|
| Value A  | Value B  | Value C  |
| Value D  | Value E  | Value F  |
Renders as:
| Column 1 | Column 2 | Column 3 |
|---|---|---|
| Value A | Value B | Value C |
| Value D | Value E | Value F |
Example: product specification table
| Specification       | Value                        |
|---|---|
| Channels            | 1408 channels                |
| GNSS systems        | GPS, GLONASS, BeiDou, Galileo |
| Horizontal accuracy | 8 mm + 1 ppm RMS             |
| Vertical accuracy   | 15 mm + 1 ppm RMS            |
| Operating temp.     | -40°C to +65°C               |
| Battery capacity    | 7000 mAh                     |
| Battery life        | Up to 10 hours               |
| Weight              | 1.1 kg                       |
| Protection rating   | IP67                         |
Every row must begin and end with a | character. If even one row is missing a pipe, the entire table collapses to plain text.
Docusaurus callout boxes (admonitions)
Docusaurus supports five types of callout box. Use them to highlight important information.
Syntax:
:::note
This is a note. Use it for general supplementary information.
:::

:::tip
This is a tip. Use it for helpful shortcuts or best practices.
:::

:::info
This is an info box. Use it for background context or clarification.
:::

:::warning
This is a warning. Use it when the reader should proceed carefully.
:::

:::danger
This is a danger box. Use it only for actions that could cause data loss
or irreversible consequences.
:::
How they render on the live site:
| Type | Appearance | When to use |
|---|---|---|
:::note | Grey box | General supplementary info |
:::tip | Green box | Helpful shortcuts, best practices |
:::info | Blue box | Background context, clarification |
:::warning | Yellow/orange box | Caution, potential mistakes |
:::danger | Red box | Destructive or irreversible actions only |
You can also give a callout a custom title:
:::warning Check the unit
Make sure the value is in metres, not millimetres.
:::
6. What Not to Touch
Frontmatter fields
Every .md file starts with a frontmatter block:
---
id: introduction
title: LUKA - Introduction
sidebar_label: Introduction
sidebar_position: 2
---
| Field | What it controls | Can staff edit? |
|---|---|---|
id | The page's unique identifier — used in internal links | No |
title | The page title shown in browser tabs and search | Yes, carefully |
sidebar_label | The label shown in the left-hand navigation | Yes, carefully |
sidebar_position | The order of this page within its section | No |
Changing id or sidebar_position can break navigation and internal links across the site. If a structural change is needed — reordering pages, renaming sections — contact the developer.
The --- delimiters themselves must never be removed or modified. If the frontmatter block is malformed, the page disappears from the site entirely.
Developer-only files
Never open or edit these files:
| File / Folder | What it does |
|---|---|
sidebars.ts | Defines the entire left-hand navigation tree |
docusaurus.config.ts | Site-wide configuration: title, URLs, plugins, theme |
src/ folder | Custom React components and theme overrides |
package.json | Node.js dependency list — changes break the build |
Do not rename or move files
If you rename a file (e.g. introduction.md → intro.md) or move it to a different folder, every existing link to that page — from other docs pages, from the website, from search results — will break with a 404 error. If a file needs to be renamed or relocated, this must be handled by the developer, who can add a redirect.
7. Uploading Images
How images work in these docs
All images in these docs are stored in a central static/img/ folder and referenced with an absolute path starting from /img/. This is different to many other documentation sites where images sit next to the text files.
The folder structure mirrors the docs structure exactly:
static/
└── img/
    ├── geosystems/
    │   ├── gnss-receivers/
    │   │   ├── luka/
    │   │   │   └── media/
    │   │   │       ├── image11.jpg
    │   │   │       └── image12.jpg
    │   │   └── oscar/
    │   │       └── media/
    │   └── mobile-mapping/
    │       └── mvp-s2/
    │           └── media/
    └── autonomy/
        └── oem-modules/
            └── mx206/
                └── media/
In a Markdown file, images look like this:

Note the path starts with /img/ — not ./images/ or a relative path. This is an absolute path from the root of the site.
:::note Why does GitHub Preview show a broken image?
When you click Preview on GitHub while editing a .md file, GitHub tries to load the image relative to the current file's location in the repository. It looks for the file at docusaurus/docs/geosystems/.../img/..., which does not exist there — images are stored separately in docusaurus/static/img/. This is expected and harmless. The image will display correctly on the live site because Docusaurus serves static/ at the root.
:::
Step-by-step: uploading a new image
1. Navigate to the correct media/ folder on GitHub.
The image folder for each product is at:
docusaurus/static/img/{subsite}/{category}/{product}/media/
For LUKA, that is:
docusaurus / static / img / geosystems / gnss-receivers / luka / media /
Click through those folders in the GitHub file tree to reach the correct media/ folder.
2. Click "Add file" → "Upload files".
┌──────────────────────────────────────────────────────────────────────┐
│  tersus-docs / docusaurus / static / img / geosystems / ... / media  │
├──────────────────────────────────────────────────────────────────────┤
│                                                                      │
│  [ Add file ▼ ]   [ Code ▼ ]                                         │
│       │                                                              │
│       ├── Create new file                                            │
│       └── Upload files          ← click this                        │
│                                                                      │
└──────────────────────────────────────────────────────────────────────┘
3. Upload your image.
┌─────────────────────────────────────────────────────────────┐
│  Upload files                                               │
├─────────────────────────────────────────────────────────────┤
│                                                             │
│  ┌─────────────────────────────────────────────────────┐   │
│  │                                                     │   │
│  │      Drag files here to add them to your           │   │
│  │      repository                                     │   │
│  │                                                     │   │
│  │              or  choose your files                  │   │
│  │                                                     │   │
│  └─────────────────────────────────────────────────────┘   │
│                                                             │
│  Commit changes                                             │
│  ┌─────────────────────────────────────────────────────┐   │
│  │ Add luka-front-panel.jpg                            │   │
│  └─────────────────────────────────────────────────────┘   │
│                                                             │
│  ( ) Commit directly to the main branch                     │
│                                                             │
│  [ Commit changes ]                                         │
└─────────────────────────────────────────────────────────────┘
Drag and drop your image file onto the upload area, or click choose your files to browse. Write a commit message and click Commit changes.
4. Reference the image in your Markdown file.
After the upload is committed, open the .md file where you want the image to appear. Insert:

The path pattern is always: /img/{subsite}/{category}/{product}/media/{filename}
| Part | Example |
|---|---|
{subsite} | geosystems or autonomy |
{category} | gnss-receivers, mobile-mapping, oem-modules, etc. |
{product} | luka, oscar, mvp-s2, mx206, etc. |
{filename} | The exact filename you uploaded, including extension |
The path is case-sensitive on the live server. If your file is named LUKA-photo.JPG, the path must use exactly that capitalisation. Use lowercase filenames to avoid this problem.
Image naming conventions
| Good name | Bad name |
|---|---|
luka-front-panel.jpg | IMG_4521.jpg |
mx206-pcb-layout.png | PCB Layout Final v2.png |
ts30-dimensions-diagram.svg | Dimensions.SVG |
Rules:
- Lowercase only
- Use hyphens (
-) to separate words, not spaces or underscores - Descriptive enough to know what it shows without opening it
- Include the product name as a prefix
Supported formats and size
| Format | Use case |
|---|---|
.jpg / .jpeg | Photos, product images |
.png | Screenshots, diagrams with transparency |
.svg | Vector diagrams, icons |
.gif | Animated sequences (use sparingly) |
.webp | Compressed modern format |
Maximum recommended size: 1 MB per image. Larger files slow down the page load. Compress images before uploading using a free tool such as Squoosh (browser-based, no install required).
8. Common Mistakes and How to Fix Them
| Mistake | What happens on the site | How to fix |
|---|---|---|
Deleted or broke the --- frontmatter delimiters | Page disappears entirely from the sidebar and site | Open the file, restore the --- lines and the fields between them exactly as they were |
Changed id: in the frontmatter | Internal links to the page break with a 404 | Revert id: to its original value — check the file history to see what it was |
Changed sidebar_position: | Page moves to wrong position in sidebar, or disappears | Revert to original value using file history |
| Missing ` | ` at start or end of a table row | Entire table renders as plain text |
| No blank line before a list | List items run into the paragraph above as one block of text | Add a blank line between the paragraph and the first - or 1. |
Unclosed bold or italic (**text without closing **) | The rest of the page may render in bold/italic unexpectedly | Find the unclosed marker and add the closing ** or * |
| Accidentally edited the wrong file | Wrong page updated on the live site | Use the file history (see Section 9) to identify and revert the change |
| Image not displaying | Broken image icon on the page | Check the path — it must start with /img/ and match the folder structure exactly, e.g. /img/geosystems/gnss-receivers/luka/media/filename.jpg. Check the filename matches exactly, including capitalisation. Note: GitHub Preview will always show a broken image — this is expected. Check the live site or Vercel preview instead. |
| Spaces in image filename | Image may fail to load on some systems | Rename the image file using hyphens, then re-upload and update the reference in the Markdown |
Admonition ::: not closing | Everything after the opening ::: renders as part of the callout | Make sure every :::note, :::tip, etc. has a matching ::: on its own line at the end |
9. Checking Your Changes
View the commit history for a file
To see every change ever made to a specific file:
- Navigate to the file on GitHub
- Click the History button in the top-right toolbar (next to the pencil icon)
┌─────────────────────────────────────────────────────────────┐
│  introduction.md         Raw   Blame   History   ✏️   🗑️    │
└─────────────────────────────────────────────────────────────┘
You will see a list of all commits that touched this file, with the author, date, and commit message. Click any commit to see what changed in that version.
Compare two versions (diff view)
When you click on a commit in the history, GitHub shows a diff — a side-by-side (or inline) view of what was added and removed:
┌─────────────────────────────────────────────────────────────┐
│  Update LUKA introduction — corrected battery spec          │
│  3 days ago · You                                           │
├─────────────────────────────────────────────────────────────┤
│  - The built-in 6800mAh large capacity battery...           │  ← removed (red)
│  + The built-in 7000mAh large capacity battery...           │  ← added (green)
└─────────────────────────────────────────────────────────────┘
Lines in red were removed. Lines in green were added. This makes it easy to confirm exactly what changed.
Revert a file to a previous version
If an edit introduced an error and you need to restore an earlier version of a file:
- Go to the file's History
- Click the commit you want to restore to (the last known-good version)
- On the commit view, find the file and click View file — this shows the file exactly as it was at that point in time
- Click the pencil icon (✏️) to open this older version in the editor
- Select all the content (
Ctrl + A), copy it (Ctrl + C) - Go back to the current version of the file
- Open the editor, select all, paste the older content
- Commit with a message like
Revert introduction.md to version from 15 Jan 2025
This manual revert process replaces the entire file. Double-check that you are copying the right version before committing. If you are unsure, contact the developer — Git has built-in revert tools that are safer for complex situations.
10. Getting Help
Content questions
If you are unsure what a specification value should be, what the correct product name is, or how to phrase something — ask the relevant product or technical team member. Do not guess and publish — incorrect technical data on the docs site reflects on the product.
Structural changes
The following require developer involvement. Do not attempt these yourself:
- Adding a new page to the docs
- Reordering pages within a section
- Creating a new section or category
- Renaming or moving files
- Changing the sidebar structure
For any of the above, describe the change you need and contact the developer. These changes touch sidebars.ts or require file moves with redirect configuration.
Build errors and broken site
If the live site does not update after your commit, or if a page shows an error, the Vercel build may have failed.
Build logs are visible at https://vercel.com — this requires admin account access. If you do not have access, contact the administrator and share the URL of the commit you made (copy the URL from the GitHub commit page after saving your changes).
Common causes of build failures:
| Cause | Symptom |
|---|---|
| Malformed frontmatter | Page missing from site, or entire site fails to build |
| Unclosed MDX tag or JSX component | Build error in Vercel logs |
| Image path with special characters | Build warning or broken image |
Editing docusaurus.config.ts incorrectly | Full site build failure |
When in doubt, revert your last change (see Section 9) and contact the developer before trying again.
Quick-Reference Checklist
Use this checklist before and after every edit session.
Before editing:
- I know which file I need to edit (used "Edit this page" link or navigated the file tree)
- I am logged in to GitHub and can see the pencil icon on the file
While editing:
- I have not touched the frontmatter
id:orsidebar_position:fields - I have checked my tables — every row starts and ends with
| - I have left blank lines before any lists
- I have closed all
:::admonitions - I have previewed using the Preview tab
When committing:
- My commit message describes what I changed and why
- I selected "Commit directly to the main branch"
After committing:
- I waited ~2 minutes and checked the live page
- I hard-refreshed the browser (
Ctrl + Shift + R) - The changes look correct on the live site