General Operations
This chapter includes setting up, configuration and other related operations.
Setting up Oscar Trek
2.1.1 Insert the battery
Open the battery cover, notice the metal contact on the bottom, put one battery align the metal contact position, and make sure the button end is close to the battery compartment.
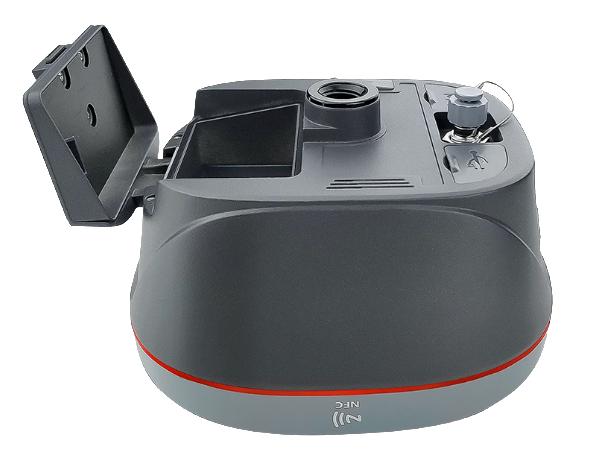
Figure 2.1 Open the battery cover
Push the battery in the direction of the arrow on the top, the battery is properly installed after a 'click', then close the cover and lock it.
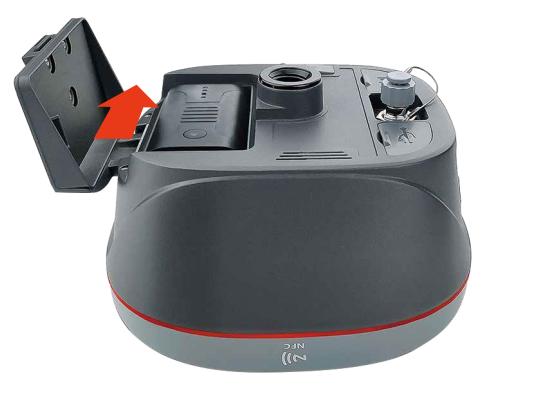
Figure 2.2 Put one battery in Oscar Trek
More details about batteries refer to section 1.3.2 Battery and Charger.
+--------------------------------------------------------------------------------------------------------------------------------------+---------------------------------------------------------------------------------------------------------------------------------------------------------------------------------------------+ | | DO NOT damage the rechargeable Lithium-ion battery. A damaged battery can cause an explosion or fire, and can result in personal injury and/or property damage. | | | | | | To prevent injury or damage: | | | | | | - DO NOT use or charge the battery if it appears to be damaged. Signs of damage include, but are not limited to, discoloration, warping, and leaking battery fluid. | | | | | | - DO NOT expose the battery to fire, high temperature, or direct sunlight. | | | | | | - DO NOT immerse the battery in water. | | | | | | - DO NOT use or store the battery inside a vehicle in hot weather. | | | | | | - DO NOT drop or puncture the battery. | | | | | | - DO NOT open the battery or short-circuit its contacts. | +--------------------------------------------------------------------------------------------------------------------------------------+---------------------------------------------------------------------------------------------------------------------------------------------------------------------------------------------+ | | DO NOT contact with the rechargeable Lithium-ion battery if it appears to be leaking. Battery fluid is corrosive, and contact with it can result in personal injury and/or property damage. | +--------------------------------------------------------------------------------------------------------------------------------------+---------------------------------------------------------------------------------------------------------------------------------------------------------------------------------------------+
Discharge a Lithium-ion battery before disposing of it. Dispose of batteries in an environmentally sensitive manner, and adhere to any local and national regulations concerning battery disposal or recycling.
To remove the battery, slide the battery in the opposite direction of the arrow and then take out the battery from the battery compartment.
2.1.2 Insert the SIM card
When 4G/3G/2G network is chosen for survey operation, you need to insert a nano SIM card into Oscar Trek GNSS receiver. Insert the nano SIM card with the contacts facing outside which is shown as below.
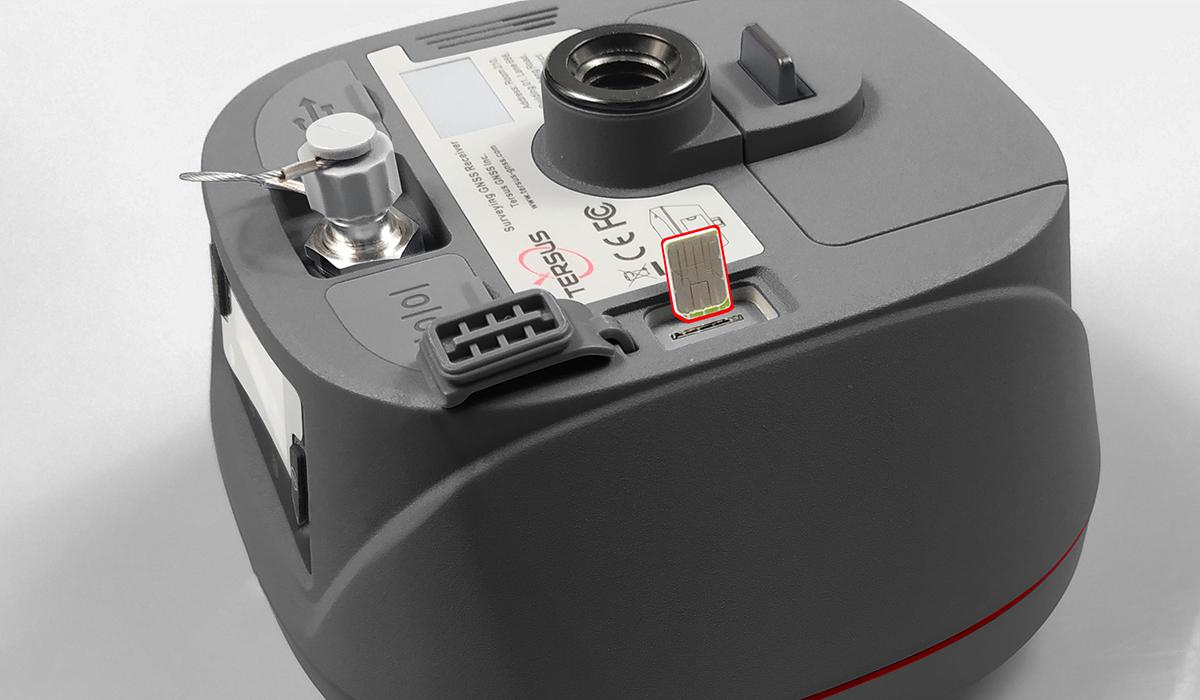
Figure 2.3 Insert the SIM card
To eject the nano SIM card, slightly push it in to trigger the spring-loaded release mechanism.
Note: The SIM card is provided by your cellular network service provider.
2.1.3 Fix Oscar Trek on a ranging pole

Figure 2.4 Oscar Trek as a rover without radio antenna
Table 2.1 Devices to set Oscar Trek as a rover without radio antenna
Device Name Quantity Items in the figure
Oscar Trek GNSS receiver 1 1, details refer to section 1.3.1
Ranging pole 1 2, details refer to section 1.3.4
Bracket for TC80 1 3
TC80 Controller 1 4, details refer to section 1.3.3
Oscar Trek configuration
You can configure Oscar Trek GNSS receiver via buttons, controller or other android devices.
2.2.1 Configure via buttons
2.2.1.1Button configuration
The detailed definition of buttons on Oscar Trek GNSS receiver refers to Table 1.1, and related context.
Table 2.2 Button configuration for Oscar Trek
Action Button operation Description
Turn on the receiver Press the power button for 2s All four LEDs light up and remain for 3s, then all go off and battery LED is steady green if battery level is >30%.
Turn off the receiver Press the power button for 3s All four LEDs light off.
Wake up Tap the power button or FN button to wake up the OLED screen when the OLED screen is off. Screen off to on.
Select Press FN button
Confirm Press the power button Confirm, cancel, or return.
Reset GNSS module Press and hold the FN button, continuously tap the power button 5 times All LEDs light up for 5 seconds.
2.2.1.2Panel options and operation introduction
- SV & BAT
Press the power button to enter the next level of display interface.
Home Screen Display Description
Satellite\ Solution NONE No satellite searched.
Solution&\
Battery
                              SINGLE      The receiver is in single point solution state.

                              FLOAT       The receiver is in float point solution state.

                              FIXED       The receiver is in fixed solution state.

                Satellites                Quantity of all visible satellites and satellite quantity of each constellation. G means GPS, R means GLONASS, B means Beidou, E means Galileo, S means SBAS, Q means QZSS.

                Battery                   Shows battery percentage.
- Mode
The current working mode of the receiver is displayed.
Home Screen Display Description
Mode Single The receiver is in Single mode.
                Base               The receiver is in Base mode.

                Rover              The receiver is in Rover mode.
- Mode Configuration
Press the power button to enter the next level of display interface.
+-----------------+----------------+-------------------------+----------------------------------------------------------------------+ | Home screen | Level 1 | Level 2 | Level 3 | +-----------------+----------------+-------------------------+----------------------------------------------------------------------+ | Mode Config | Base Mode | TCS | Set Format: RTCMv2.3/ RTCMv3/ RTCMv3.2/ RTD/ CMR | | | | | | | | | (Tersus Caster Service) | | +-----------------+----------------+-------------------------+----------------------------------------------------------------------+ | | | | Check Device ID | +-----------------+----------------+-------------------------+----------------------------------------------------------------------+ | | | | Set Server | +-----------------+----------------+-------------------------+----------------------------------------------------------------------+ | | | Ntrip Server | Set Format: RTCMv2.3/ RTCMv3 / RTCMv3.2/ RTD/ CMR | +-----------------+----------------+-------------------------+----------------------------------------------------------------------+ | | | | Check historical IP address & Port | +-----------------+----------------+-------------------------+----------------------------------------------------------------------+ | | | Internal Radio | Set Protocol: TRANSEOT/ TT450/ SOUTH/ SATEL/ TRIMMK3 | +-----------------+----------------+-------------------------+----------------------------------------------------------------------+ | | | | Set Air-Baud-Rate: 9600/ 19200/ 4800 | +-----------------+----------------+-------------------------+----------------------------------------------------------------------+ | | | | Set Format: RTCMv2.3/ RTCMv3 / RTCMv3.2/ RTD/ CMR | +-----------------+----------------+-------------------------+----------------------------------------------------------------------+ | | | | Set Power: 0.5W(Low) / 1W(Medium) / 2W(High) | +-----------------+----------------+-------------------------+----------------------------------------------------------------------+ | | | | Set Channel: 0--9 | +-----------------+----------------+-------------------------+----------------------------------------------------------------------+ | | | | Set Customize Freq. | +-----------------+----------------+-------------------------+----------------------------------------------------------------------+ | | | External Radio | Set Serial Port Baud Rate: 9600/ 19200/ 38400/ 57600/ 115200/ 460800 | +-----------------+----------------+-------------------------+----------------------------------------------------------------------+ | | | | Set Data Speed (Full/ High/ Medium/ Low) | +-----------------+----------------+-------------------------+----------------------------------------------------------------------+ | | | | Set Format: RTCMv2.3/ RTCMv3 / RTCMv3.2/ RTD/ CMR | +-----------------+----------------+-------------------------+----------------------------------------------------------------------+ | | Rover Mode | TCS | Set Base ID: ******** | | | | | | | | | (Tersus Caster Service) | | +-----------------+----------------+-------------------------+----------------------------------------------------------------------+ | | | | Set Server | +-----------------+----------------+-------------------------+----------------------------------------------------------------------+ | | | NTRIP Client | Check historical IP Address & Port | +-----------------+----------------+-------------------------+----------------------------------------------------------------------+ | | | TCP Client | Check History & Add Address | +-----------------+----------------+-------------------------+----------------------------------------------------------------------+ | | | Internal Radio | Set Protocol: TRANSEOT/ TT450/ SOUTH/ SATEL/ TRIMMK3 | +-----------------+----------------+-------------------------+----------------------------------------------------------------------+ | | | | Set Air-Baud-Rate: 9600/ 19200/ 4800 | +-----------------+----------------+-------------------------+----------------------------------------------------------------------+ | | | | Set Channel: 0--9 | +-----------------+----------------+-------------------------+----------------------------------------------------------------------+ | | | | Set Customize Freq. | +-----------------+----------------+-------------------------+----------------------------------------------------------------------+ | | Single Mode | Confirm/ Cancel | / | +-----------------+----------------+-------------------------+----------------------------------------------------------------------+ | | Tilt.: ON/OFF | ON/OFF | / | +-----------------+----------------+-------------------------+----------------------------------------------------------------------+ | | | Pole Height | Input Pole Height | +-----------------+----------------+-------------------------+----------------------------------------------------------------------+ | | Static: ON/OFF | Static: | AUTO/ MANUAL/ OFF | +-----------------+----------------+-------------------------+----------------------------------------------------------------------+ | | | Recording: | Check recording time(**min) | +-----------------+----------------+-------------------------+----------------------------------------------------------------------+ | | | Frequency: | Select 1Hz/5Hz/10Hz/20Hz/\ | | | | | 60s/30s/15s/10s/5s as Freq. | +-----------------+----------------+-------------------------+----------------------------------------------------------------------+ | | | Mask Elevation: | Input Mask Elevation Angle | +-----------------+----------------+-------------------------+----------------------------------------------------------------------+ | | | Duration: | Set recording duration(**min) | +-----------------+----------------+-------------------------+----------------------------------------------------------------------+ | | | Ant. Height: | Input Antenna Height(*.**m) | +-----------------+----------------+-------------------------+----------------------------------------------------------------------+ | | | Measure Type: | Select Vertical/ Pole/ Slant | +-----------------+----------------+-------------------------+----------------------------------------------------------------------+ | | | Data Format: | Select TRS/ OFF | +-----------------+----------------+-------------------------+----------------------------------------------------------------------+ | | | RINEX Format: | Select 2.10/ 3.02/ 3.04/ OFF | +-----------------+----------------+-------------------------+----------------------------------------------------------------------+
- Device Information
Press the power button to enter the next level of display interface.
Home screen Level 1 Level 2 Level 3
Device Info GNSS INFO Constellation Select GPS& GLONASS& BEIDOU& GALILEO& QZSS ON/ OFF
                                  RTK Mode                                          Select Mode:Normal/ Never Wrong

                                  Reset RTK                                         Reset GNSS module

                                  Hardware                                          Hardware Version

                                  Firmware                                          Firmware Version

                Voice             ON/ OFF                                           /

                Change BAT        ON/ OFF                                           /

                WIFI              WIFI:                                            Select AP/ OFF/ STA

                                  SSID/ IP/ MAC                                     Check Address

                Cellular          SIM card                                          Inserted/ Not Inserted

                                  IMEI/Network/Signal                               /

                Int.Radio         Check Freq.& Power& Protocol& Air Baud& Channel   /

                Bluetooth         Name                                              TersusGNSS - \*\*\*\*\*\*\*\*(Device ID)

                                  Status                                            Connected/ Unconnected

                                  MAC                                               Address: \*\*:\*\*:\*\*:\*\*:\*\*:\*\*

                Disk Management   DiskUse: \*\*%, Empty Disk, Download Log          /

                Data Broadcast    Bluetooth                                         ON/ OFF

                                  Serial Port                                       Serial Port: ON/ OFF

                                                                                    Baud Select: 9600/ 19200/ 38400/ 57600/ 115200/ 460800

                                  TCP Cast                                          ON/ OFF

                                                                                    Set Port

                                  TCP Push                                          ON/ OFF

                                                                                    Set IP Address

                                                                                    Set Port

                                  NMEA Select                                       Set GGA、GSA、GSV、GST、GLL、RMC、ZDA、VTG output Freq.

                                  Tilt Data                                         ON/ OFF

                                  Diff Data                                         ON/ OFF

                Debug Mode        ON/ OFF                                           /

                                  Debug Info Select                                 GNSS INFO ON/ OFF

                                                                                    Tilt. ON/ OFF

                                                                                    Int. Radio ON/OFF

                                                                                    NTRIP ON/ OFF

                Language          Switch Language                                   Switch among 中文/繁體中文/日本語/ Français / Español / Türkçe / English

                Registration      Registered                                        /

                                  Unregistered                                      /

                SN                Serial Number                                     /

                PN                Product Number                                    /

                FW                Firmware Version                                  /

                HW                Hardware Version                                  /
2.2.2 Configure via TC80 controller
The detailed introduction of TC80 controller refers to section 1.3.3 and technical specification refers section 3.2. Here in this section describes how to configure Oscar Trek via Nuwa app which is installed in TC80 controller.
2.2.2.1Connect Oscar Trek in Nuwa
The general operations of Nuwa app refer to User Manual for Nuwa App which can be downloaded on Tersus official website.
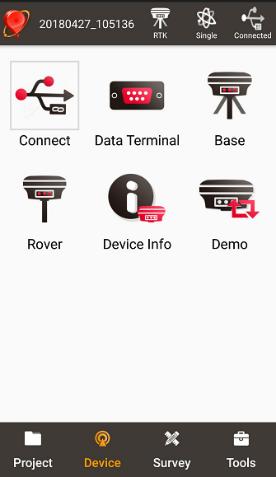
Figure 2.5 Device functional group
When Oscar Trek GNSS receiver is powered on, to connect Oscar Trek, put TC40/TC80 controller near the NFC logo on Oscar Trek, the TC40/TC80 controller connects to Oscar Trek's WiFi automatically; or click [Device] -> [Connect] under an opened project, and select [Oscar Trek] for the Device Type which is shown as below.
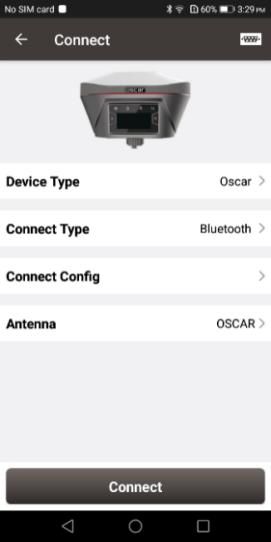
Figure 2.6 Connect Oscar Trek via WiFi
Click [Connect Config] to search and connect to Oscar Trek's WiFi. Then click [Connect] to enable the communication between TC40/TC80 controller and Oscar Trek.
2.2.2.2Registration
When the registration is not effective, follow below steps to complete the registration.
-
Connect the TC80 controller to your computer with a mini USB cable, and choose "Use USB for Transfer files" on the TC80 screen.
-
Click TC80 -> Internal storage -> TersusSurvey on the computer, then copy the license file obtained from Tersus Technical Support to the "TersusSurvey" folder.
-
Open Nuwa app on TC80, click [Register] in Device information interface. Click [Refresh] to update the registration status.
Note:
a. The registration file is text format file saved as xxx.txt.
b. The registration file name consists of the first three digits and the last five digits of the SN number. The example is as below.
 Figure 2.7 Example of Oscar Trek's registration file
The other method is registering using QR code.
Click the scan button at the top right of the device information interface and directly scan the QR code provided by Tersus to complete the registration.
2.2.2.3Configure rover
To configure Oscar Trek as a rover, back to Device interface which is shown in Figure 2.6 Device functional group, click [Rover], then create a work mode of detailed configurations for base or rover which are shown as below.
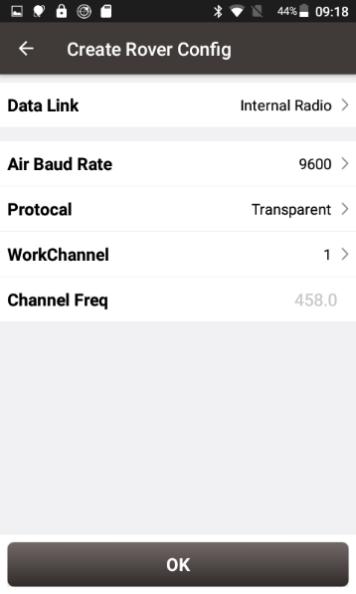
Figure 2.8 Rover configuration
Fill in the detailed information of rover configuration, then click [OK] and back to the work mode list, select this configuration to start data transmission for rover which are shown as below.
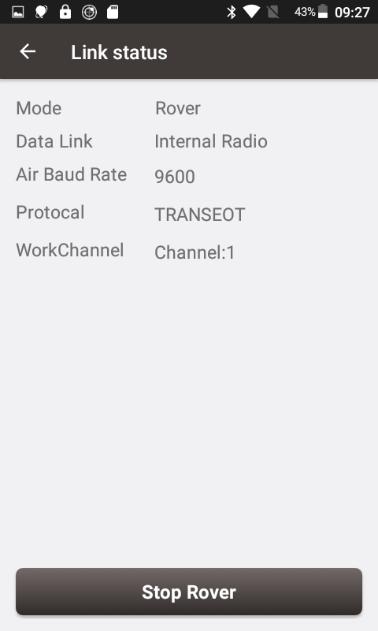
Figure 2.9 Link status of Rover
Data download
2.3.1 Connection
Oscar Trek can be used as an USB storage device when connecting with a computer. Before connecting Oscar Trek to a computer, ensure Oscar Trek is powered on. Use the Mini USB cable in the package to connect Oscar Trek to the USB port of a computer which is shown as below.
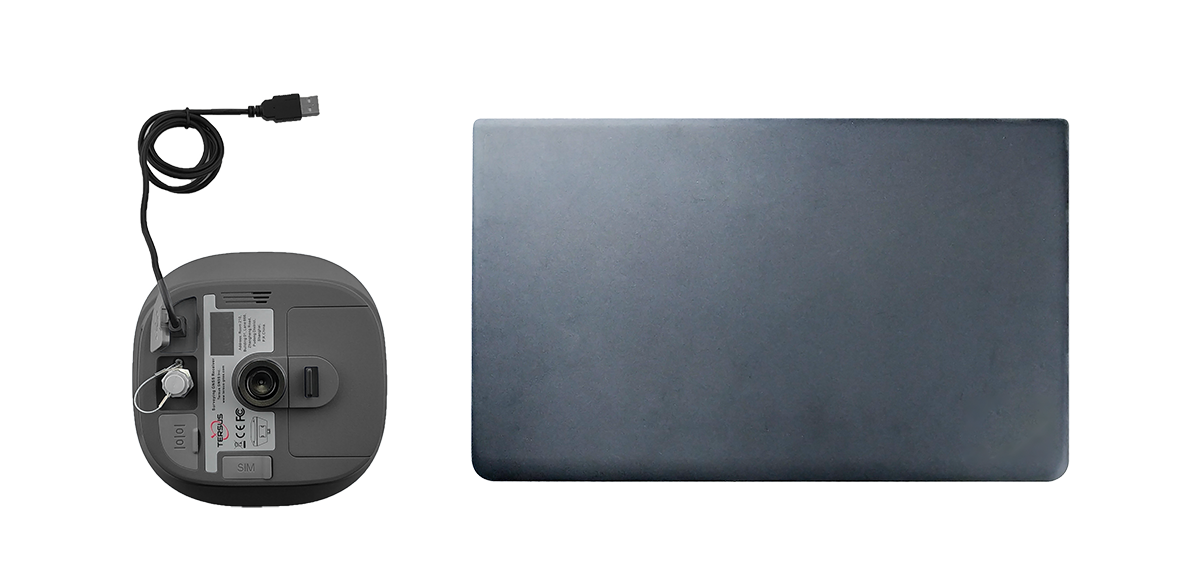
Laptop
Figure 2.10 Connect Oscar Trek to a computer
After completing the connection, a USB device named \OscarData is listed in the file browser of the computer. Find the data file needed to download, copy and paste it to a designated folder in your computer.
2.3.2 Download static data
If you want to download the recorded static data for post processing, find \record\static folder in the USB drive shown as below, and then copy the specific file you need to your computer.

Figure 2.11 Static record folder
Each folder named after the date contains rinex format and tersus binary data, which can be downloaded and processed as you need.

Figure 2.12 Static data for one day
2.3.3 Download debug data
When you don't turn on the debug mode, find \debug\xxx\LOG folder and you can see rtkmain.log file which includes all the operation information of the receiver.

Figure 2.13 rtkmain.log file location
Click [Device] -> [Device Debug] -> [Set] in Nuwa app. The debug information includes GNSS, tilt, internal radio and NTRIP information. After you select some debug info to turn on and confirm, Oscar Trek will record them when you are doing survey work.
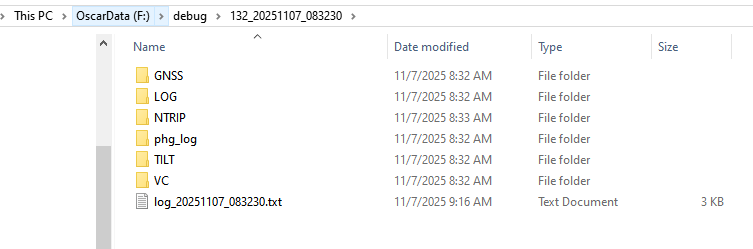
Figure 2.14 Debug info folders
Send these debug info to Tersus technical support team to help solve the problems you encountered.
Firmware upgrade
2.4.1 View Oscar Trek firmware version
When Oscar Trek GNSS receiver is powered on, go to [Device] -> [Connect] in Nuwa App, and select [Oscar Trek] as the Device Type. Tap [Connect Config] to search for and connect to the Oscar Trek's WiFi. Then click [Connect] to enable the communication between controller and Oscar Trek.
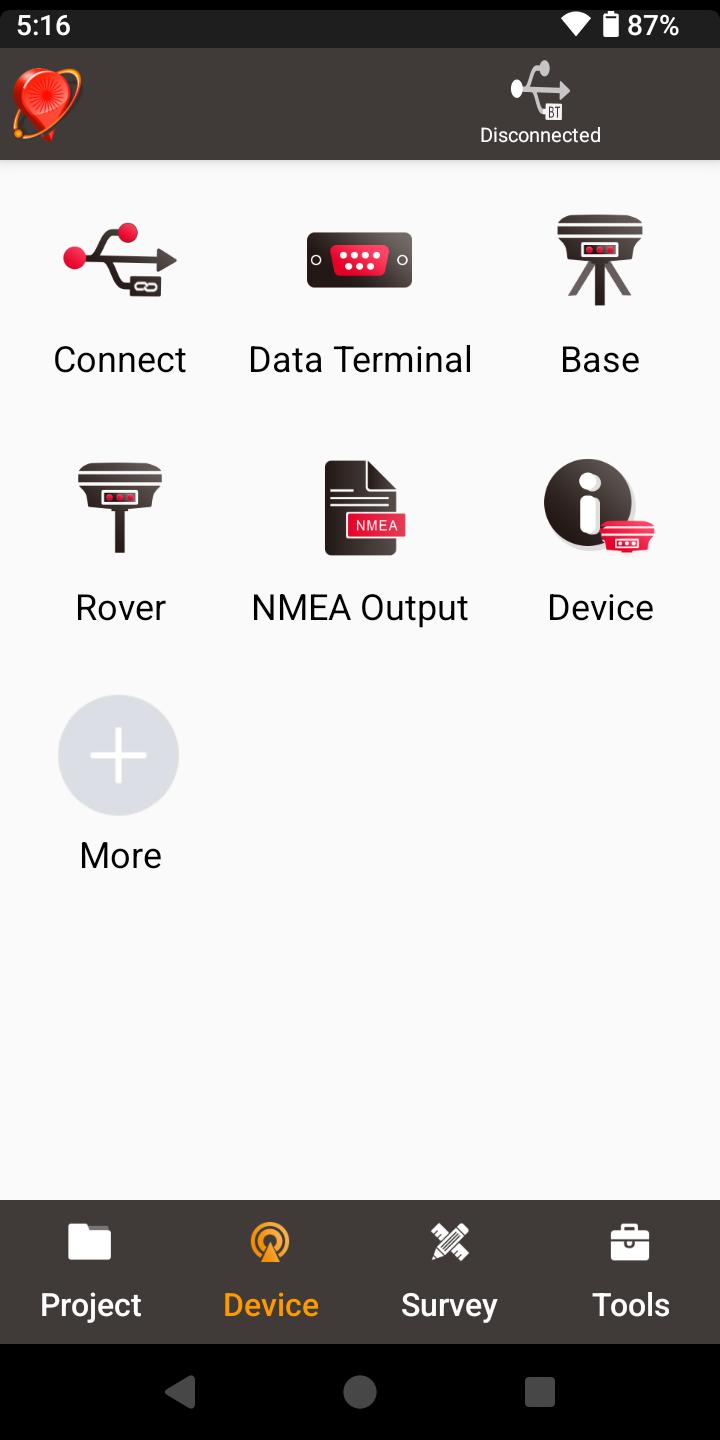
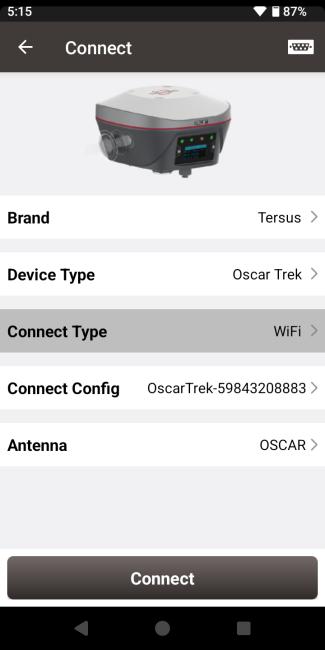
Figure 2.15 Connect to Oscar Trek via WiFi
Click [Device] -> [Device], the Oscar Trek info is shown as below. You can view Oscar Trek firmware version.
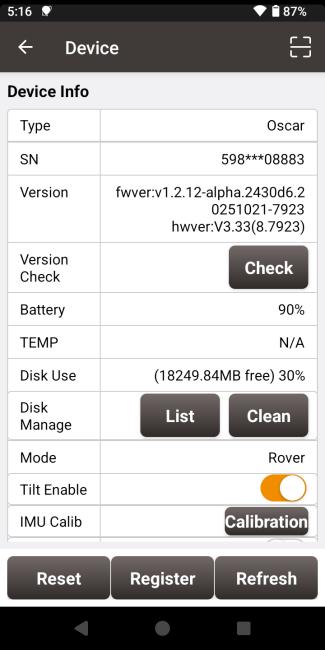
Figure 2.16 View Oscar Trek firmware version
You can also check the firmware version on the Trek LED panel.
In [Device Info] - [GNSS Info], view the firmware version of GNSS board.
In [Device Info] - [FW], view the Oscar Trek firmware version.
2.4.2 Upgrade the firmware through the built-in storage of the host
The detailed steps are as follows.
-
Download the latest firmware file from Tersus website
[https://tersus-gnss.com/software/gnss-smart-antennas]
Please be noted that the downloaded file is a .zip file, unzip this file to find the firmware file of .BIN format.
-
Prepare a Mini USB cable, when Oscar Trek is turned on, connect the Mini USB port of Oscar Trek to the computer with a Mini USB cable.

Figure 2.17 Mini USB cable connect the computer and Oscar Trek
- The computer interface will automatically pop up two removable disks. As shown in the figure below.

Figure 2.18 Two Removable Disks
- Choose the Oscar TrekUpdate removable disk and put the firmware file in the .BIN format on this removable disk. As shown in the figure below.

Figure 2.19 The FW is placed in the Oscar TrekUpdate removable disk
- Unplug the Mini USB cable, press and hold the power button for 3 seconds to shut down Oscar Trek .
6) Make sure that Oscar Trek is turned off, then press and hold the power button for 2 seconds to turn on Oscar Trek. When the TERSUS icon appears, the boot is successful. Release the button and Oscar Trek will enter upgrade mode. During the upgrade, the device will automatically reboot several times while displaying the TERSUS icon. Please wait until the upgrade is complete.
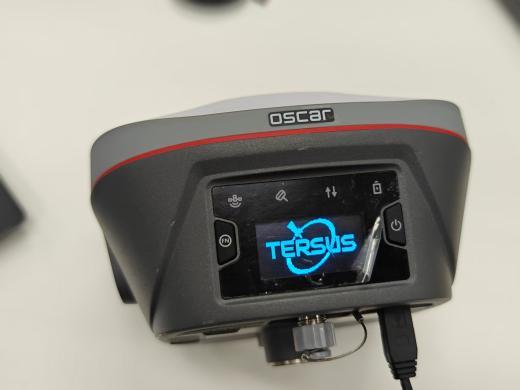
Figure 2.20 Upgrading
After the LED panel displays the operation interface, you can check whether the Oscar Trek firmware upgrade is successful. If it is consistent with the latest firmware version in the removable disk, it means the firmware upgrade is successful.
Note: Please make sure the battery has enough power for the firmware upgrade. The GNSS board inside Oscar Trek will upgrade when the firmware is upgrading, any forced power failure will cause the system crash.
Operations of TC80 controller
2.5.1 Insert SIM card and SD card
Please note the direction of the card notch when inserting the card, inserting a non-standard card may cause damage to the SIM card slot of the controller.
To install the card you need to pull out the SIM card slot on the side.
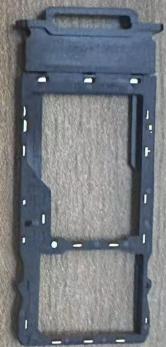
Figure 2.21 SIM card slot
2.5.2 Using of touch screen
-
Single Click: To select an icon. For example, click dial to open the keypad which will be displayed on the screen.
-
Double Click: To zoom-in or zoom-out. For example, to zoom-in or out of a photo, click twice when viewing a photo or browsing on the internet.
-
Hold: press and hold the screen, icon or input box to get more operation options.
a) Long-Time Click a picture in the gallery list interface, the status bar prompts to select a picture, you select to share or delete it.
b) Long-Time Click the blanks of home screen to add home screen widgets.
c) Long-Time Click the blanks of home screen wallpaper sources can be selected.
d) Long-Time Click the blanks of home screen to home settings.
-
Slide Upward: Slide up on the main screen ( or click the upward arrow icon) to view more applications.
-
Slide Downward: Slide down on any interface to open the status bar and message board.
-
Slide Left and Right: Slide left and right on the main screen to switch the desktop interface.