Nuwa Brief Introduction
-
Introduction
-
Installation
-
Update Nuwa
-
Main Interface
Introduction
Nuwa is a survey application software based on Android OS (Operating System), designed by and all rights reserved to Tersus Inc. Nuwa is simple, easy to use and has friendly UI (User Interface). It is designed to work with Tersus products including David GNSS receiver, Oscar GNSS receiver, Luka GNSS receiver, BX series OEM boards and other receivers which support NEMA-0183.
Main features of Nuwa App:
-
Supports Bluetooth/USB connection and related operations for Tersus receivers.
-
Powerful data management makes survey data management more convenient. Easy for data editing and import / export of several types of formats.
-
Convenient to set up a base station or a rover, and supports setting to transmit and receive differential data through the radio, receiver network or PDA network.
-
Optimized survey and stakeout, supports GNSS Linework and road stakeout, more functions, and more simple operation.
-
Built-in a variety of ellipsoids and projections, various languages and national coordinate systems. Supports user-defined coordinate system which is more adaptable.
-
Provide tools for indirect measurement for easier work.
-
Supports new release detection and online upgrades.
Installation
There are two methods of installing Nuwa app in an android device.
- Search Nuwa in Google Play Store, click [Install], install the application and open it after the installation is completed. The screenshots are as follows.
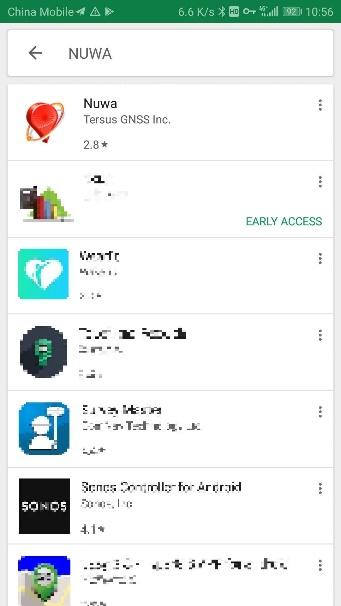
Figure 1.1[]{#_Toc13877 .anchor} Nuwa in Google Play Store
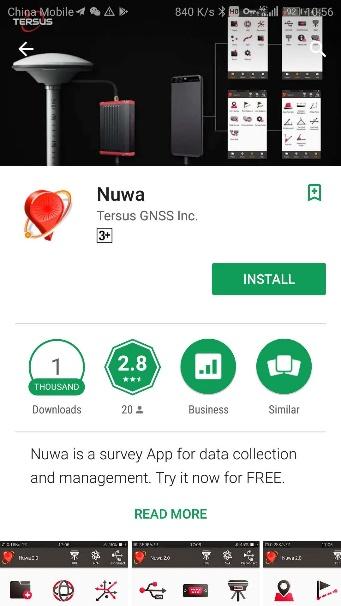
Figure 1.2[]{#_Toc12844 .anchor} Nuwa in Google Play Store -- install

Figure 1.3[]{#_Toc7938 .anchor} Nuwa in Google Play Store -- open
- Copy the .apk file to the storage of an Android device, click it to start installation. The Nuwa icon will be on the desktop after it is installed successfully.
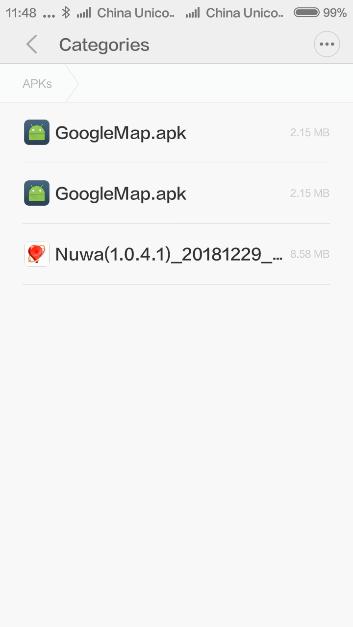
Figure 1.4[]{#_Toc20915 .anchor} Nuwa copied in an android device
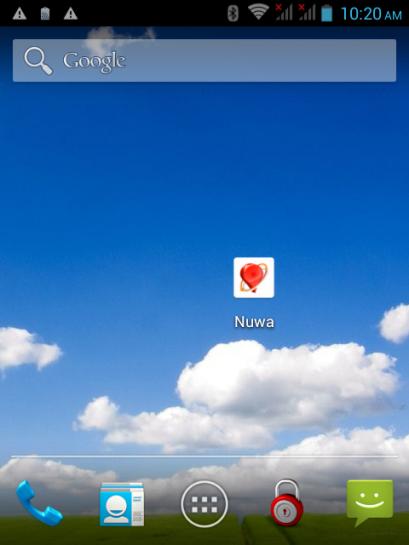
Figure 1.5[]{#_Toc23222 .anchor} Nuwa icon on desktop
Update Nuwa
There are three methods of updating Nuwa app in an android device.
- Update Nuwa in Google Play Store which is shown below.

Figure 1.6[]{#_Toc8096 .anchor} Update Nuwa in Google Play Store -- 1
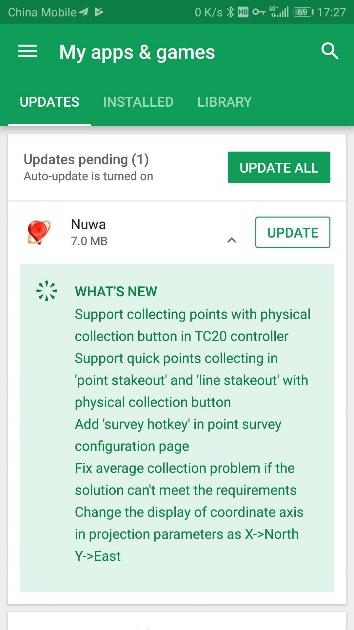
Figure 1.7[]{#_Toc11935 .anchor} Update Nuwa in Google Play Store -- 2
-
Update Nuwa by copying the latest .apk installation file to the storage of an android device. The process is the same with that in the above section of installation.
-
Update Nuwa in the 'Settings' page inside Nuwa app. In the condition that the android device is connected to internet and [Update Detection] is turned on, it automatically pops up an update prompt every time you open Nuwa and it can be seen that there is red 'new' on the right of version number if current Nuwa version is detected to be ready to update.
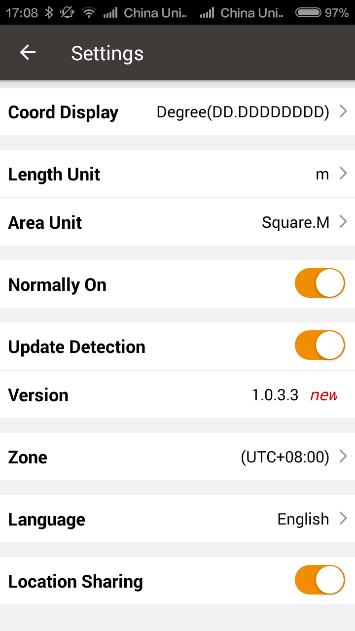
Figure 1.8[]{#_Toc736 .anchor} Version in Settings page
If [Update Detection] is not turned on, tap the row of version, it pops out a window indicating software update. Select [Update] to update the app automatically. Select [Later] to ignore this notification.
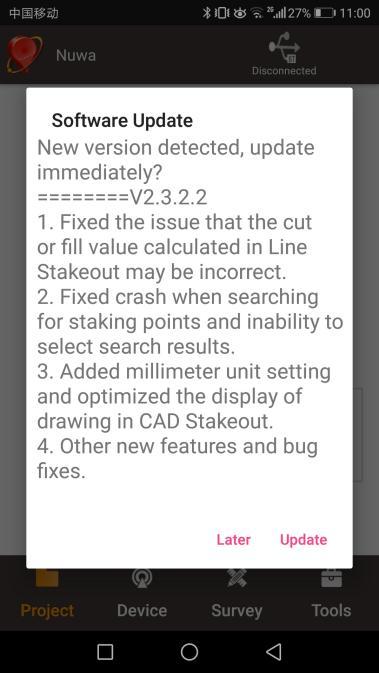
Figure 1.9[]{#_Toc26915 .anchor} Software Update notification
Main Interface
Nuwa has four main functional groups: Project, Device, Survey and Tools. While Nuwa is running, slide left or right on the screen to enter other functional groups.

Figure 1.10[]{#_Toc28178 .anchor} Nuwa Main Interface
On the main interface of Nuwa, click [More] or press and hold the icon on the screen to enter edit mode for icons. In this mode, click [-] to hide icons on the main interface, click [+] to add icons on the main interface, or long press and drag to modify the order of icons on the main interface. Click the red font [Click here to exit Edit Mode] at the top right, or press the return key to exit the edit mode.
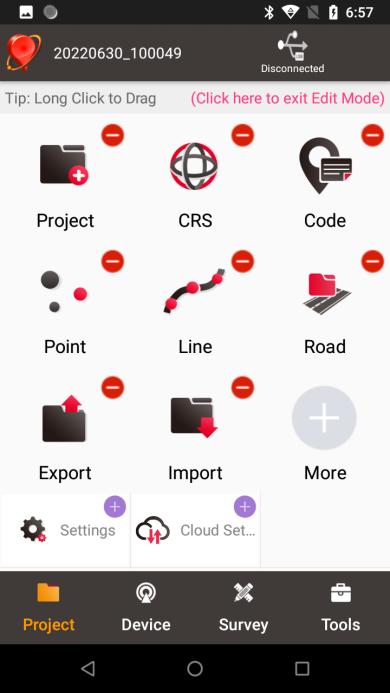
Figure 1.11[]{#_Toc19468 .anchor} Edit Mode
- Status Bar
Icon Description
 Project Information, the current project name is displayed.
![]() Device information, when a device is connected, click it to check details about the receiver connected. Refer to section 3.6 for detailed description.
Device information, when a device is connected, click it to check details about the receiver connected. Refer to section 3.6 for detailed description.
![]() Satellites status, when a device is connected, it displays satellite positioning status which includes: None, Single, DGPS, Float and Fixed. Click this icon to view satellite information which is shown in the figures below.
Satellites status, when a device is connected, it displays satellite positioning status which includes: None, Single, DGPS, Float and Fixed. Click this icon to view satellite information which is shown in the figures below.
 Connection status, if there is no device connected, it displays Disconnected. Click this icon to enter connect interface, refer details in section 3.1. If there is a device connected, this icon displays the 2D and 3D accuracy of current connected device.
- Satellite Info
Four functional groups: Project, Device, Survey and Tools.
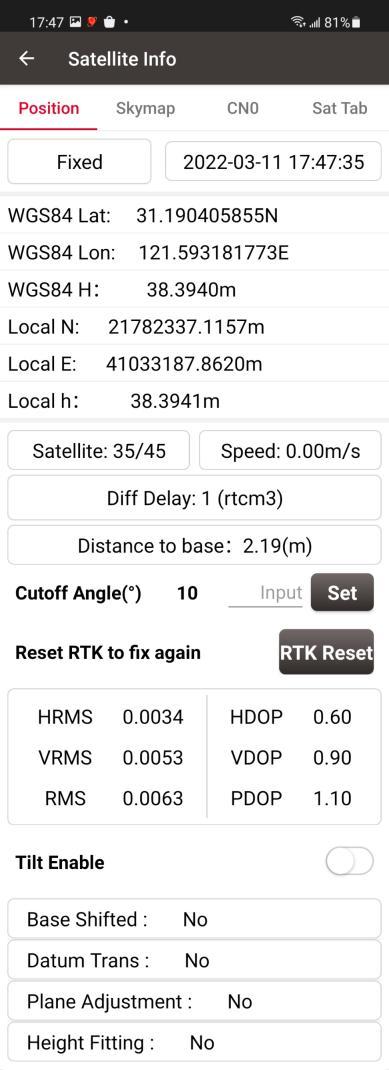
Figure 1.12[]{#_Toc15491 .anchor} Satellite Info -- Position
In the figure above, 'Single' indicates the current solution status of the receiver. The solution status includes Fixed, Float, DGPS, Single, Base Manual and Base Auto.
Clicking the box of date and time can switch time zone, clicking 'WGS84 Lat' or 'WGS84 Lon' can switch display from options of Degree (DD.DDDDDD), DM (DD:MM.MMMM) and DMS (DD:MM:SS.SS), clicking 'WGS84 H' or 'Local N' or 'Local E' or 'Local h' can switch unit from options of km, m, inch, and feet.
'Satellite: 22/24' indicates that 22 satellites used and 24 satellites observed / tracked. Click to show the number of satellites used in different systems.
'Speed: 0.01m/s' is the moving speed of the receiving antenna.
'Diff Delay: 1' indicates that the differential delay is 1 second.
'Distance to base: 1.52m' means the distance between rover and base is 1.52m.
Elevation Mask Angle can be set between 0 and 90 degrees. Modifying the elevation mask angle does not show a change in the number of satellites observed and used.
HRMS, VRMS and RMS indicate the horizontal, vertical and total value of root mean square.
HDOP, VDOP and PDOP indicate the horizontal, vertical and position of dilution of precision.
'Tilt Enable': Tilt compensation can be turned on or off when connecting to Oscar Ultimate, Luka Ultimate and Luka Advanced. If it is on, information about the angle and its accuracy will be displayed here.
The last four rows of this interface present the status of base shift, datum transformation, plane adjustment and height fitting.
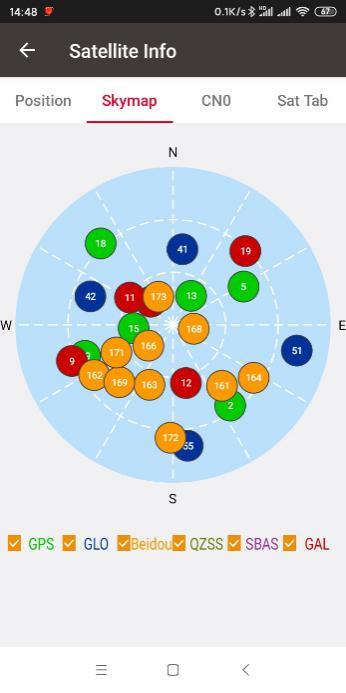
Figure 1.13[]{#_Toc28964 .anchor} Satellite Info -- Skymap
In the figure above, the sky map displays the elevation angle and azimuth of satellites of different satellite systems. A satellite at the center of the circle means its elevation angle is 90 degrees, a satellite on the circumference means its elevation angel is 0 degree. At the bottom of this interface, one or more constellations can be ticked to display.
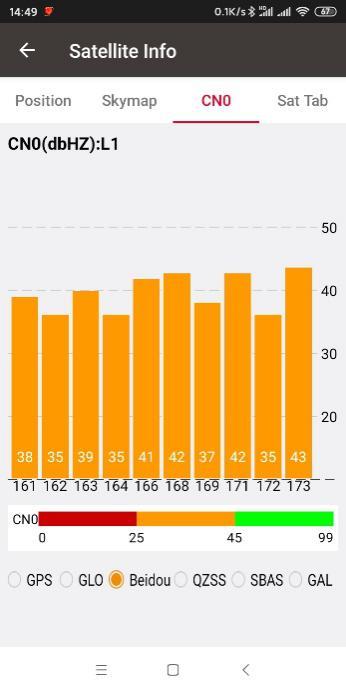
Figure 1.14[]{#_Toc23389 .anchor} Satellite Info -- CN0 L1
In the figure above, it shows the CNR (Carrier Noise Ratio) of different satellites in specified constellation. Clicking the histogram area can switch the CN0 between L1, L2 and L5.
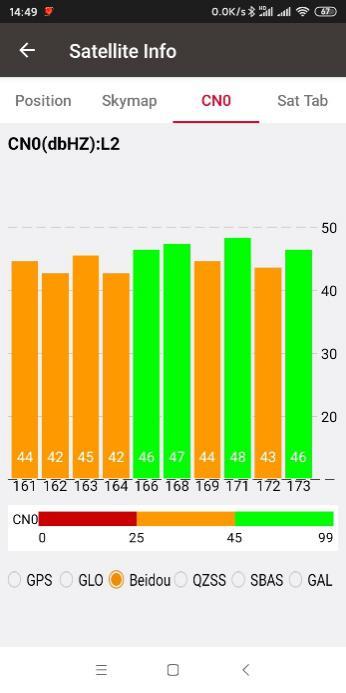
Figure 1.15[]{#_Toc23810 .anchor} Satellite Info -- CN0 L2
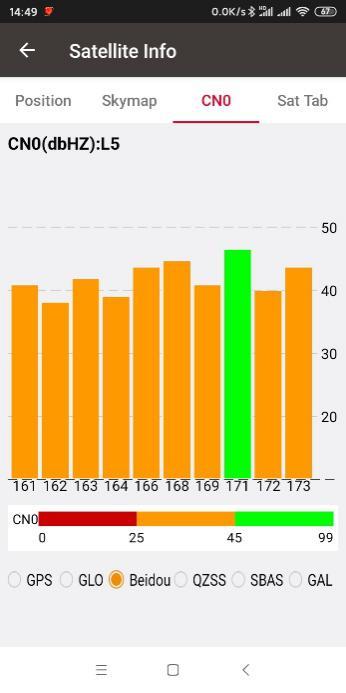
Figure 1.16[]{#_Toc4891 .anchor} Satellite Info -- CN0 L5
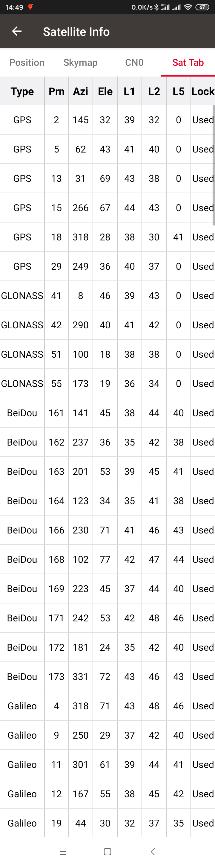
Figure 1.17[]{#_Toc13347 .anchor} Satellite Info -- Sat Tab
In the figure above, it shows the satellite information in table which including satellite type, PRN code, azimuth, elevation angle, CN0 value of L1, CN0 value of L2, CN0 value of L5 and satellite using status.
When connecting to the receiver and the receiver is set to rover mode, the Base Info interface is displayed, which includes the base station WGS84 latitude and longitude coordinates and geodetic height, North-East and elevation coordinates. If the rover acquires correction data from another Tersus single base device (with radio link or network link), the base station power, correction data format and the satellite number will also be correctly displayed.

Figure 1.18[]{#_Toc1344 .anchor} Base Info
- Menu area
List all the menu items in the current functional group.
Quick Start
- Create a new project
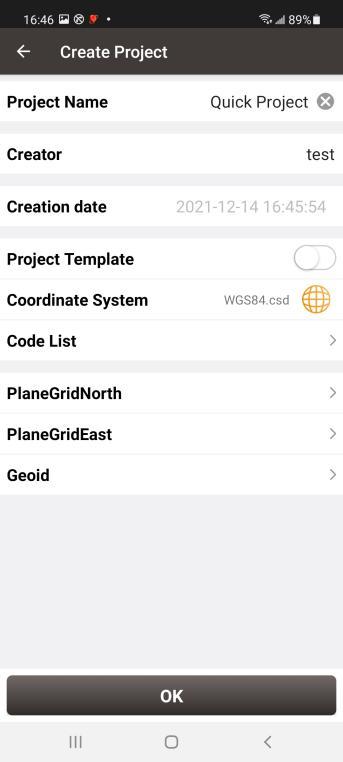
Go to [Project] -> [Project], click [New], input the project name, select a CRS or edit with a template CRS, click [OK] to create a project.
+----------------------------------------------------------------------------------------------------------------------------------------------------------------------------+----------------------------------------------------------------------------------------------------------------------------------------------------------------------------+
|  |
|  |
| | |
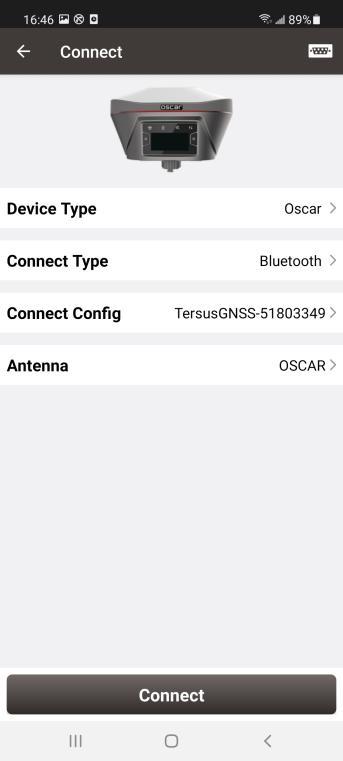
| Figure 1.19[]{#_Toc17981 .anchor} Create Project | Figure 1.20[]{#_Toc12873 .anchor} Connect |
+----------------------------------------------------------------------------------------------------------------------------------------------------------------------------+----------------------------------------------------------------------------------------------------------------------------------------------------------------------------+
|
| | |
| Figure 1.19[]{#_Toc17981 .anchor} Create Project | Figure 1.20[]{#_Toc12873 .anchor} Connect |
+----------------------------------------------------------------------------------------------------------------------------------------------------------------------------+----------------------------------------------------------------------------------------------------------------------------------------------------------------------------+
- Connect a device
Go to [Device] -> [Connect], select the device type, connect type, connect config and antenna type, and click [Connect].
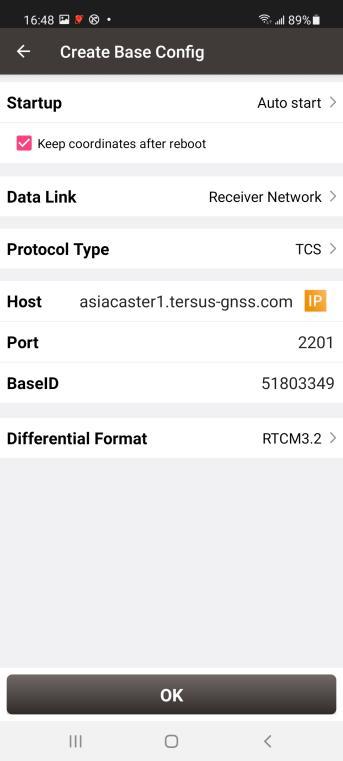
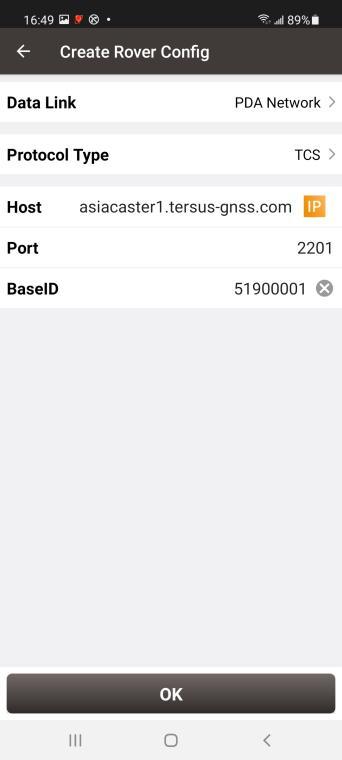
- Configure the base or the rover
A base transmits RTK corrections to a radio or to network. The position of the base must be input manually or auto start. Nuwa supports RTK uploading to a NTRIP host, which brings convenience for a number of applications.
+----------------------------------------------------------------------------------------------------------------------------------------------------------------------------+----------------------------------------------------------------------------------------------------------------------------------------------------------------------------+
|  |
|  |
| | |
| Figure 1.21[]{#_Toc25551 .anchor} Base Configure | Figure 1.22[]{#_Toc7136 .anchor} Rover Configure |
+----------------------------------------------------------------------------------------------------------------------------------------------------------------------------+----------------------------------------------------------------------------------------------------------------------------------------------------------------------------+
|
| | |
| Figure 1.21[]{#_Toc25551 .anchor} Base Configure | Figure 1.22[]{#_Toc7136 .anchor} Rover Configure |
+----------------------------------------------------------------------------------------------------------------------------------------------------------------------------+----------------------------------------------------------------------------------------------------------------------------------------------------------------------------+
A rover receives RTK corrections from a radio or from network. NTRIP, TCP and TCS protocols are supported if corrections are received from network.
All the configuration can be managed, such as created, edited and deleted in Nuwa App. A device can be configured to work as a base or as a rover.
- Site Calibration and Base Shift
The site calibration is to find the mathematical conversion relationship (transition parameter) between WGS84 and the local plane Cartesian coordinate system. Site calibration includes the calculation of four-parameter plane transformation and the calculation of height fitting parameters. There are three methods for height fitting: Fixed Difference Correction, Plane Fitting and Surface Fitting.
In Auto Start mode, if a base is moved, re-installed or powered off, Base Shift is necessary to make the points have the same coordinates before and after the change. Main steps:
Go to [Survey] -> [Base Shift], select GNSS points and known points, click [Calculate], the offsets parameters are calculated automatically. The user can apply the parameters on the points to be surveyed. Base Shift also influence coordinates value of other points with this base.
Steps 5 -- 8 are action points in fields, select one or more in fields.
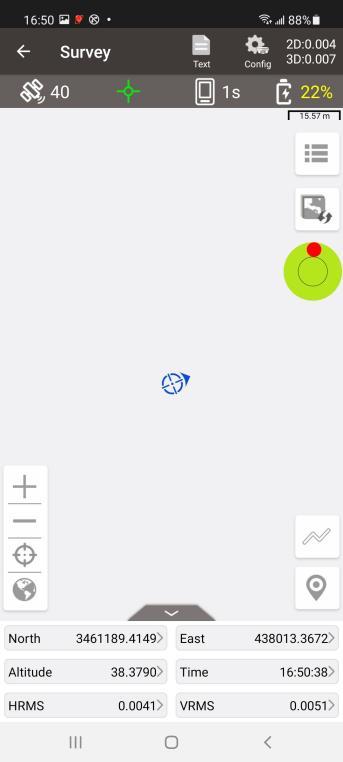
- Survey
Go to [Survey] -> [Survey] to enter survey interface, which can be in text mode or drawing mode. The main difference between the two modes is whether the drawing is displayed. The configuration refers to section 4.7.1 Common Config for more details.
Two collection modes: Auto Collect and Manual Collect, refer to section 4.1 Survey for details. All the detailed information about the survey points can be checked in the survey point library.
- Point Stakeout
Go to [Survey] -> [Point Stakeout] to enter point stakeout interface. Stakeout points must be saved in the stakeout point library before. Select the points to be stakeout and find the target point according to the prompt information by Nuwa, refer to section 4.2 Point Stakeout for details.
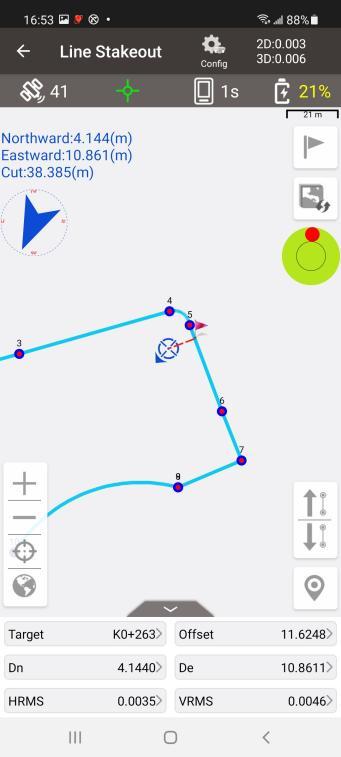
- Line Stakeout
Go to [Survey] -> [Line Stakeout] to enter line stakeout interface. Stakeout lines muse be saved in the stakeout line library. Select the lines to be stakeout and find all the points on the target line according to the prompt information by Nuwa, refer to section 0
Line Stakeout for details.
+----------------------------------------------------------------------------------------------------------------------------------------------------------------------------+----------------------------------------------------------------------------------------------------------------------------------------------------------------------------+----------------------------------------------------------------------------------------------------------------------------------------------------------------------------+
|  |
|  |
|  |
| | | |
| Figure 1.23[]{#_Toc12797 .anchor} Survey | Figure 1.24[]{#_Toc22354 .anchor} Point Stakeout | Figure 1.25[]{#_Toc28827 .anchor} Line Stakeout |
+----------------------------------------------------------------------------------------------------------------------------------------------------------------------------+----------------------------------------------------------------------------------------------------------------------------------------------------------------------------+----------------------------------------------------------------------------------------------------------------------------------------------------------------------------+
|
| | | |
| Figure 1.23[]{#_Toc12797 .anchor} Survey | Figure 1.24[]{#_Toc22354 .anchor} Point Stakeout | Figure 1.25[]{#_Toc28827 .anchor} Line Stakeout |
+----------------------------------------------------------------------------------------------------------------------------------------------------------------------------+----------------------------------------------------------------------------------------------------------------------------------------------------------------------------+----------------------------------------------------------------------------------------------------------------------------------------------------------------------------+
- Static Survey
Go to [Survey] -> [Static Survey] to enter static survey interface. Select the parameters, such as interval, cut off angle, antenna parameters and click [Start], refer to section 4.5 Static Survey for details.
- Import and Export
Go to [Project] -> [Import] to enter import interface, which can be divided into Coordinate Import and Other Import. Coordinate import is to import points in a .csv file or .dat file. Other import is to import points in DXF or SHP files. Click [File Path] to select the file directory.
Go to [Project] -> [Export] to enter export interface. The supporting file formats include: csv, kml, shp, dxf, html, xml, sima, kmz, ncn and rw5. The data to be exported can be filtered by point type and collection time. Click [Export] after all the options are filled.