Device
-
Connect
-
Data Terminal
-
Base
-
Rover
-
NMEA Output
-
Device
-
TAP
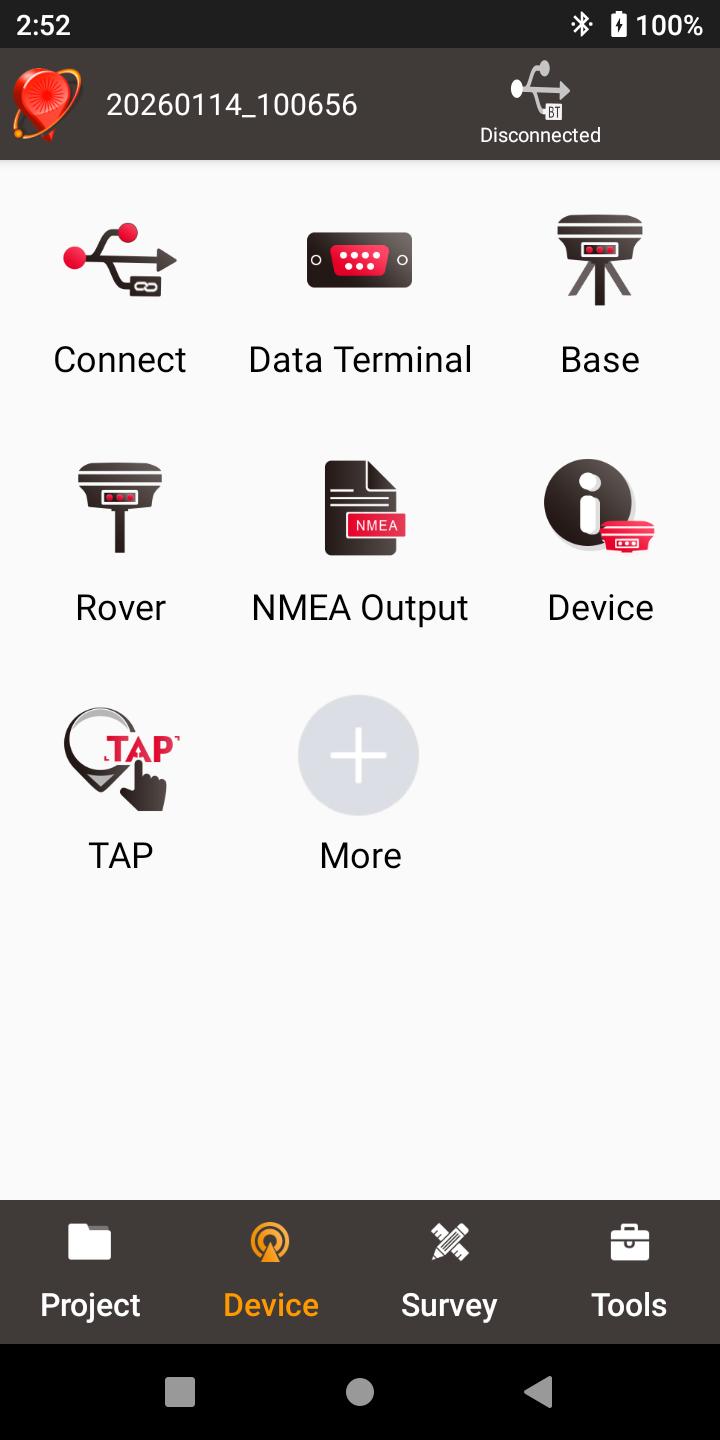
Figure 3.1[]{#_Toc31187 .anchor} Functions under Device
Connect
There are two ways to enter the Connect interface: Click [Device] -> [Connect] or click [ ] on the up right corner in the status bar. Screenshots and descriptions are as follows.
Figure 3.2[]{#_Toc12945 .anchor} Device functional group
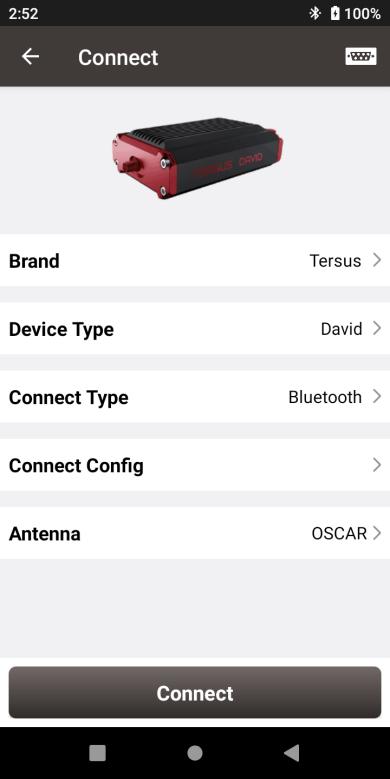
Figure 3.3[]{#_Toc26577 .anchor} Connect interface -- David
[Brand]: Tersus for Oscar, Luka, Oscar Trek, TS20, TS21, and Others for NMEA, Simulation and Internal
[Device Type]: can be selected from Oscar, Luka, Oscar Trek, TS20, TS21 and NMEA^1^ devices, Simulation, Internal.
[Connect Type]: can be selected from USB, Bluetooth or WiFi.
[Connect Config]: shows the device name to be connected
[Antenna]: can be selected from the antenna list. An antenna with user-defined parameters can be added and selected.
^1^Note: NMEA devices should be able to output one of following data: GGA / GSA / GSV / GST / RMC/ RANGEB.
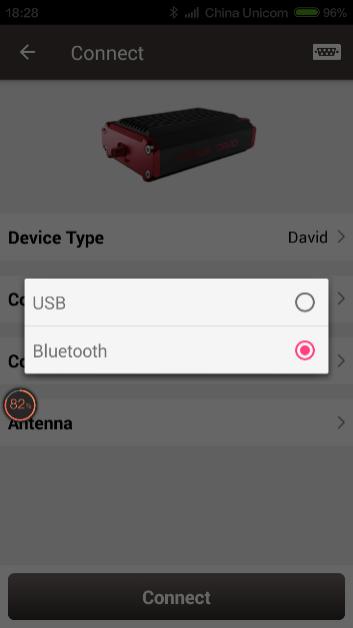
Figure 3.4[]{#_Toc10903 .anchor} Two connection types for David
-
USB connection: David can be connected to an android device using a 'USB Type A Female to USB (Micro+Type C) OTG cable' in the package. The detailed connection refers to User Manual for David GNSS Receiver.
-
Bluetooth connection: David can be connected to an android device via wireless method -- Bluetooth using 'COMM1-Bluetooth module' in the package.
- Add Bluetooth to the list: select Bluetooth for the [Connect Type], click [Connect Config] and [Search], choose the Bluetooth module to be paired.
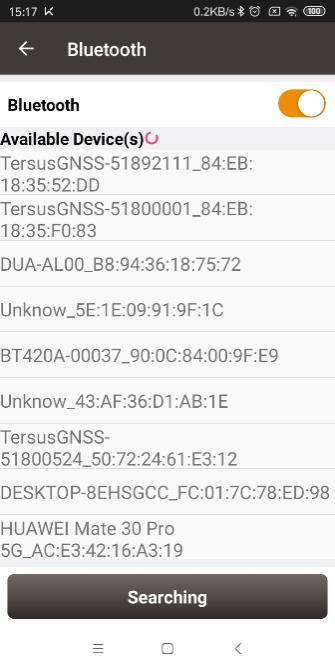
Figure 3.5[]{#_Toc16363 .anchor} Bluetooth searching
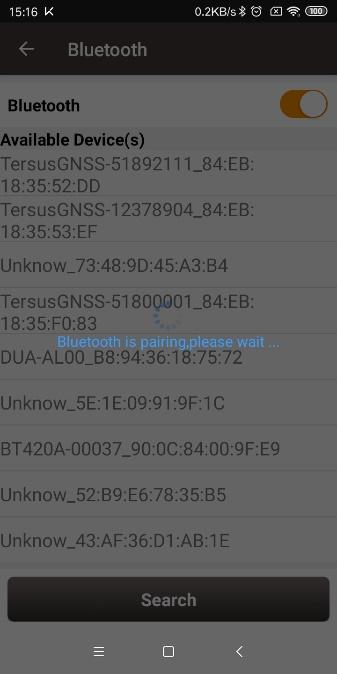
Figure 3.6[]{#_Toc16241 .anchor} Bluetooth is pairing

Figure 3.7[]{#_Toc7197 .anchor} Bluetooth paired
- Remove paired Bluetooth: long press the paired Bluetooth name in the Bluetooth list to remove this paired Bluetooth device in the list.
+-----------------------------------------------------------------------------------------------------------------------------------------------------------------------+-----------------------------------------------------------------------------------------------------------------------------------------------------------------------+
|  |
|  |
| | |
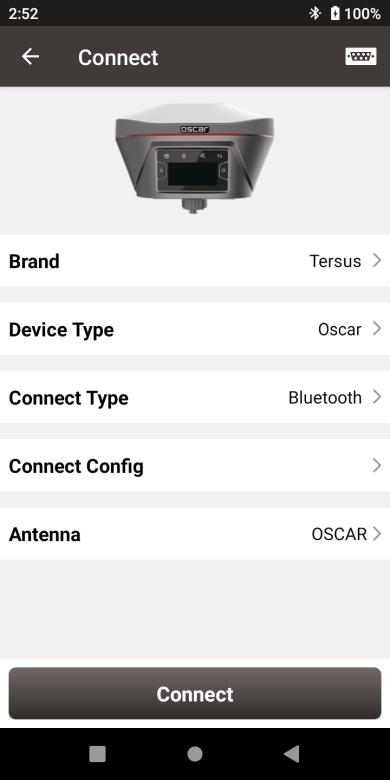
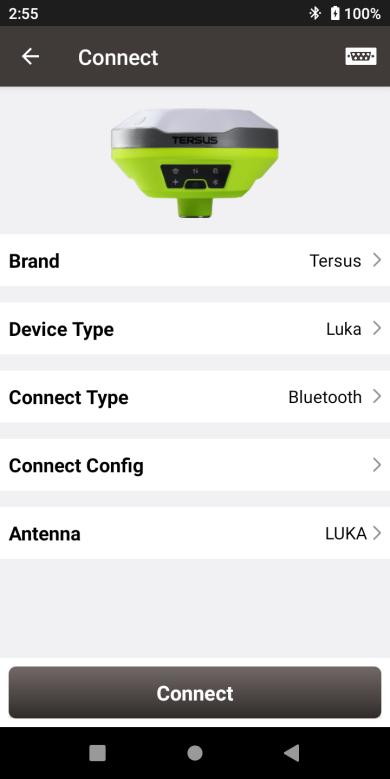
| Figure 3.8[]{#_Toc10087 .anchor} Connect interface -- Oscar | Figure 3.9[]{#_Toc24549 .anchor} Connect interface -- Luka |
+-----------------------------------------------------------------------------------------------------------------------------------------------------------------------+-----------------------------------------------------------------------------------------------------------------------------------------------------------------------+
|
| | |
| Figure 3.8[]{#_Toc10087 .anchor} Connect interface -- Oscar | Figure 3.9[]{#_Toc24549 .anchor} Connect interface -- Luka |
+-----------------------------------------------------------------------------------------------------------------------------------------------------------------------+-----------------------------------------------------------------------------------------------------------------------------------------------------------------------+
Currently the connection type for Oscar / Luka is Bluetooth only, the other connection types are under development. Stay tuned for the updates. The Bluetooth connection of Oscar / Luka is the same with that of David. OSCAR is selected as default antenna for Oscar GNSS Receiver. And LUKA is selected as default antenna for Luka GNSS Receiver.
+-----------------------------------------------------------------------------------------------------------------------------------------------------------------------+----------------------------------------------------------------------------------------------------------------------------------------------------------------------+
|  |
|  |
| | |
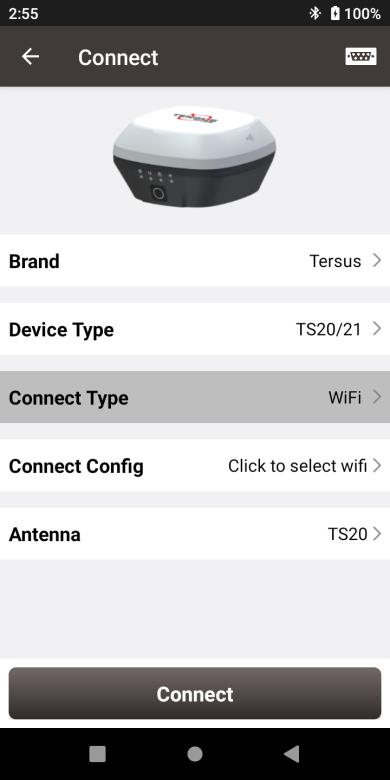
| Figure 3.10[]{#_Toc5944 .anchor} Connect interface -- Oscar Trek | Figure 3.11[]{#_Toc25521 .anchor} Connect interface -- TS20/21 |
+-----------------------------------------------------------------------------------------------------------------------------------------------------------------------+----------------------------------------------------------------------------------------------------------------------------------------------------------------------+
|
| | |
| Figure 3.10[]{#_Toc5944 .anchor} Connect interface -- Oscar Trek | Figure 3.11[]{#_Toc25521 .anchor} Connect interface -- TS20/21 |
+-----------------------------------------------------------------------------------------------------------------------------------------------------------------------+----------------------------------------------------------------------------------------------------------------------------------------------------------------------+
Currently the connection type for Oscar Trek and TS20/21 is WiFi only, for the large amount of the data transmission of video and photos, and the other connection types are under development. Stay tuned for the updates. OSCAR is selected as default antenna for Oscar Trek GNSS Receiver. And TS20 is selected as default antenna for TS20 and TS21 GNSS Receiver.
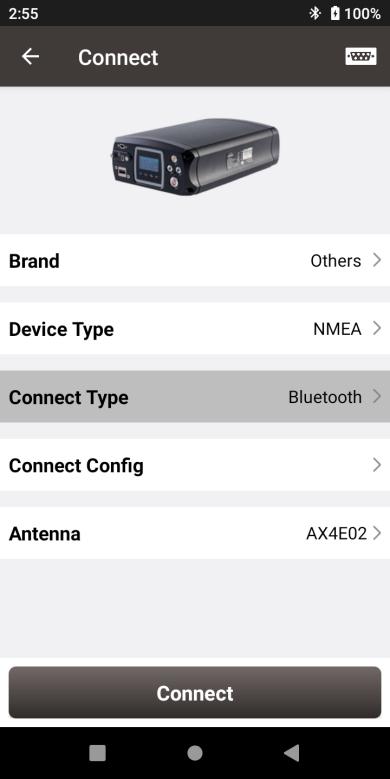
Figure 3.12[]{#_Toc23454 .anchor} Connect interface -- NMEA
Currently this connect interface is showing MatrixRTK as an example. In fact, other NMEA devices which support NMEA0183 can also be connected. For NMEA devices, only Bluetooth is used for connect type.
Click [Antenna] to enter the Antenna Manage interface which is shown as below.
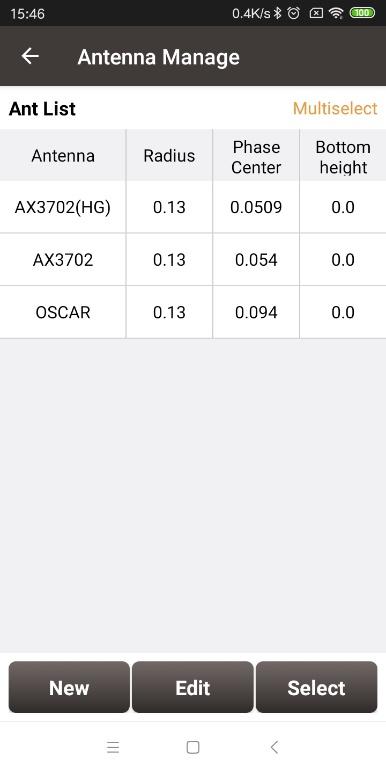
Figure 3.13[]{#_Toc29843 .anchor} Antenna Manage interface
Click [New] in the left bottom corner to add new antenna parameters which is shown as below.
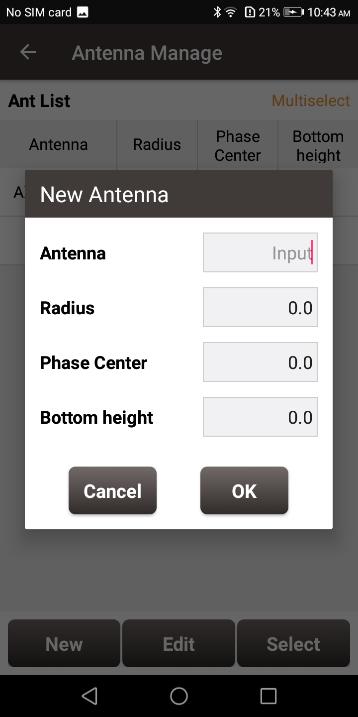
Figure 3.14[]{#_Toc1074 .anchor} Parameters for New Antenna
[Antenna]: input the antenna name for the new antenna.
[Radius]: input the radius of the new antenna when measuring the slant height. Input 0.13 when using the height measure accessory provided by Tersus.
[Phase Center]: input the height from the antenna phase center to the antenna bottom.
[Bottom height]: input the height from the antenna circumference to the antenna bottom.
Note: the unit for the above three parameters is meter (m).
The following figure explains the above three parameters taking AX3702 antenna for example. R: Radius; P: Phase center; B: Bottom height.
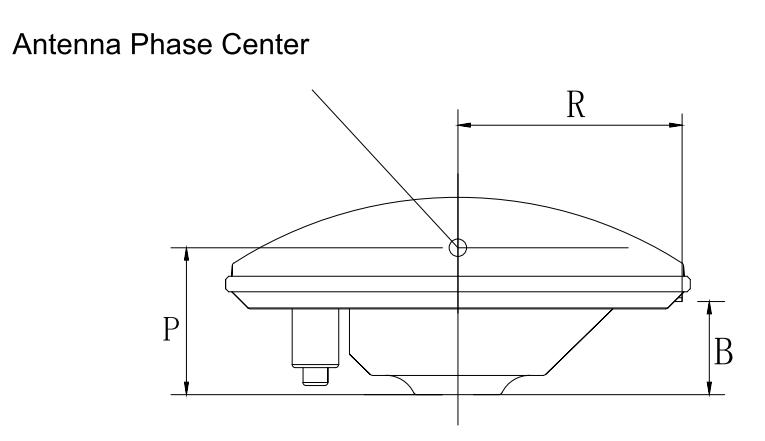
Figure 3.15[]{#_Toc31804 .anchor} Antenna parameters explanation
When selecting Simulation for the device type, the interface is as below.
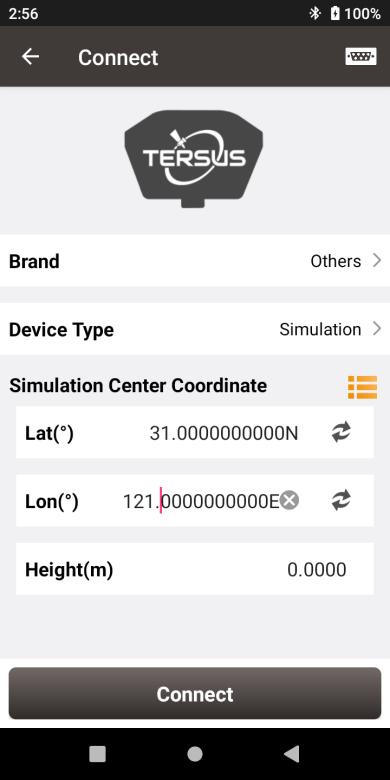
Figure 3.16[]{#_Toc25655 .anchor} Simulation connection interface
The simulation connection be simulated at the place around the coordinates according to the input coordinates or the coordinates selected from the library. The simulation connection can be used for demonstration of survey, stakeout, and etc. However, some functions such as working mode configuration will be restricted.
Data Terminal
In the data terminal interface, the output loggings can be monitored as shown below. It is outputting ASCII data when David is connected with AX3702 GNSS antenna and it is working normally.
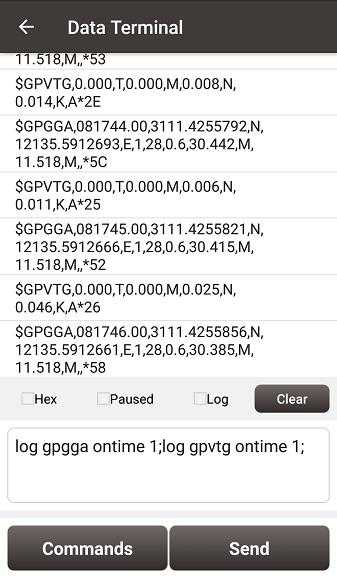
Figure 3.17[]{#_Toc25896 .anchor} Data Terminal interface
Check the box on the left of [Hex] to enable the above window output hex data which is shown below.
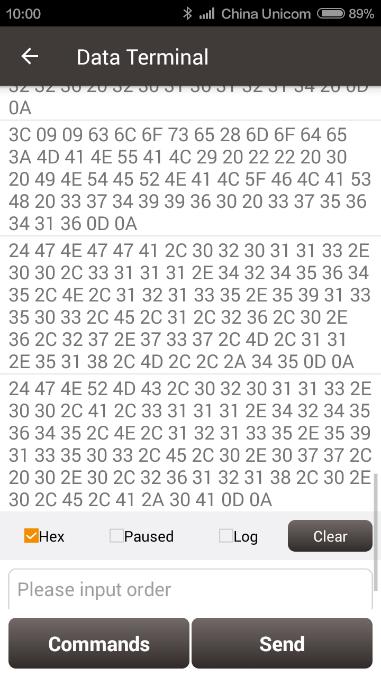
Figure 3.18[]{#_Toc8241 .anchor} Data Terminal outputs hex data
Check the box on the left of [Paused] to pause the output logging.
Check the box on the left of [Log] to start recording log data. The log data is saved in a .txt file. Create file name in the pop-up window as shown below.
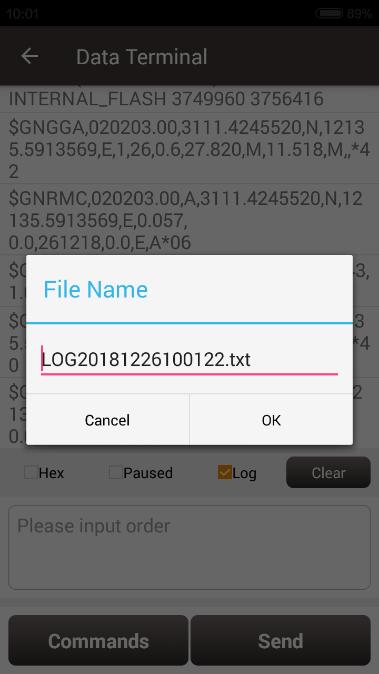
Figure 3.19[]{#_Toc3862 .anchor} Create File Name
Click [OK] to confirm the file name, it automatically starts recording log data and stores the data in the default folder /storage/emulated/0/TersusSurvey/GpsLogger/xxxxxx.txt.
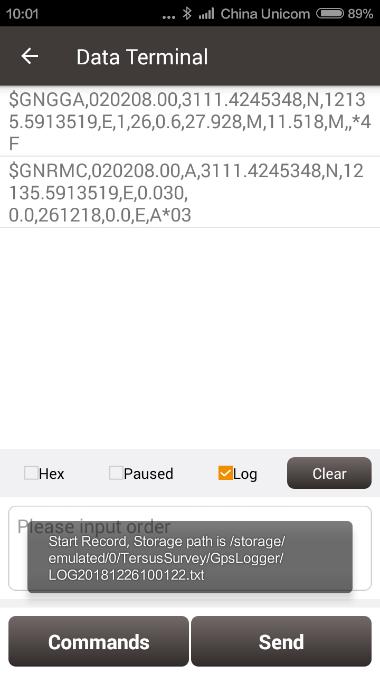
Figure 3.20[]{#_Toc26102 .anchor} Start recording log data
Uncheck the box on the left of [Log] is to stop recording log data.
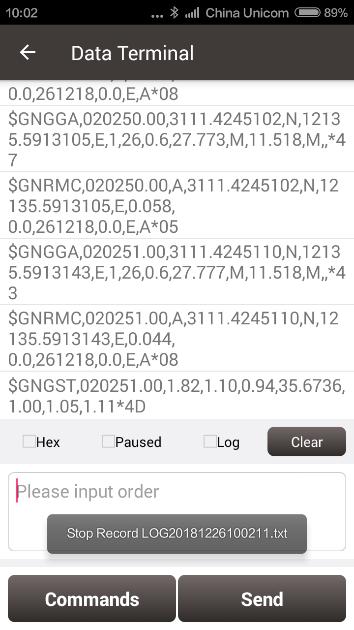
Figure 3.21[]{#_Toc26555 .anchor} Stop recording log data
Click [Clear] to clear the screen.
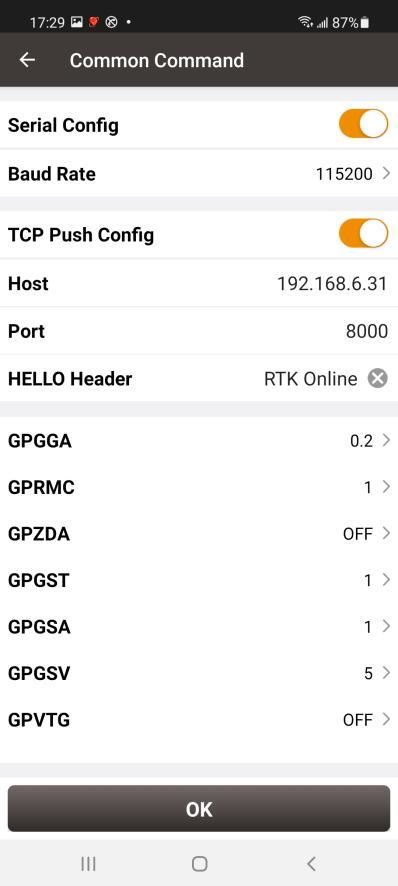
Click [Commands] to output common NMEA loggings (not available for connecting Oscar / Luka). Check the commands and click [OK], it will return to the command window with the typed commands which is shown in Figure 3.17. Then click [Send] to send the commands to communicate with Tersus receivers.
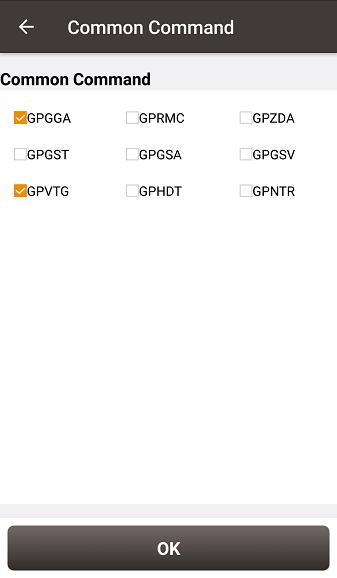
Figure 3.22[]{#_Toc27400 .anchor} Common Command
The detailed description of log and command refers to Log & Command Reference for Tersus BX GNSS OEM boards which can be downloaded on Tersus website.
Note: [Commands] and [Send] are not available when Nuwa is connected with Oscar / Luka.
Base
Some default base configurations are provided for David and Oscar / Luka. Select a configuration file in the Work Mode List and click [Detail] to edit the base configuration. Click [Start] to complete the base configuration.
[Startup]: auto start or manual start
-
Auto start: the position of the base is achieved automatically.
-
Manual start: base coordinate is achieved by averaging collection, loaded from a point library or input manually.
[Data Link]: radio or network for David.
-
Radio: the corrections are output to an external radio, serial baud rate should be selected accordingly.
-
Network: the corrections are uploaded to a Ntrip server or TCP host. The IP address, port, password and mount point of the Ntrip server should be input manually; The IP address and port of the TCP host should be input.
Four options for data link of Oscar / Luka.
-
External Radio: the corrections are transmitted via 25W radio.
-
Internal Radio: the corrections are transmitted via internal 2W radio of Oscar or internal 1.5W radio of Luka. Oscar internal radio currently supports three transmit powers of 0.5W, 1W, and 2W, Luka internal radio currently supports two transmit powers of 0.5W and 1.5W, and supports five protocols, TransEOT, TT450, SOUTH, SATEL, and TRIMMK3, and two corresponding air baud rates 9600bps and 19200bps. Each protocol supports ten channels and customized frequency. Select 0~9 channel on Nuwa will automatically read the corresponding frequency to the channel.
-
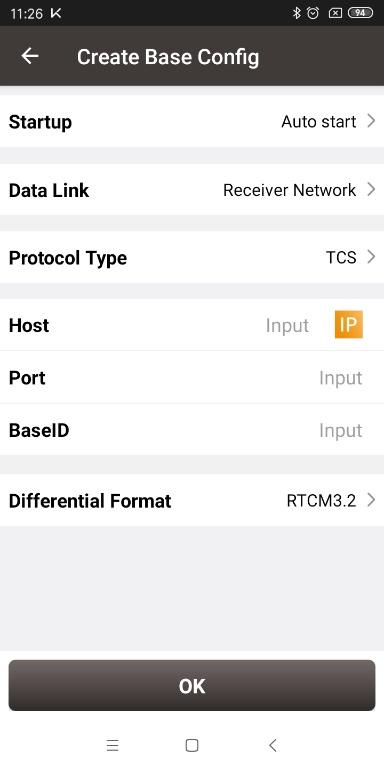
Receiver Network: the corrections are uploaded to Ntrip server or TCP host, or Tersus Caster Service (TCS) using Oscar / Luka network. The IP address, port, password and mount point of the host should be input manually.
-
PDA Network: the corrections are uploaded to Ntrip or TCP host, or Tersus Caster Service (TCS) using a PDA device. The IP address, port, password and mount point of the host should be input manually.
[Baud Rate]: the serial baud rate can be selected from 9600 to 921600, the default is 38400bps for David and 115200bps for Oscar / Luka. The air baud rate for Oscar / Luka internal radio can be selected from 9600 and 19200.
[Differential Format]: CMR, CMR+, RTCM2.3, RTCM3.0 and RTCM3.2 are supported.
Set David as a Base
The detailed description for each configuration of David as a base is shown in below screenshots.
Click [New] to create a new base configuration. In the figure below, for auto start in radio mode, baud rate is 38400 by default and can be selected in the pop-up list below. The differential format is RTCM3.2 by default.
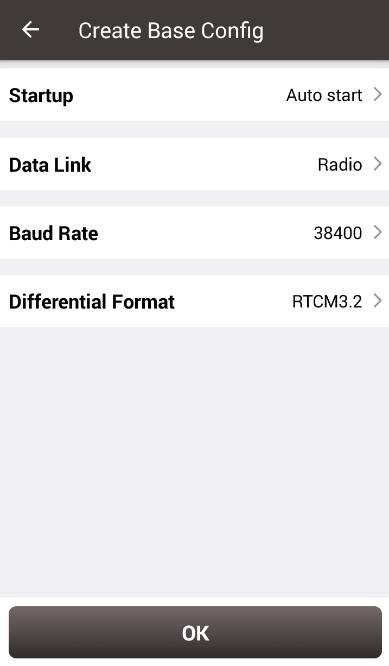
Figure 3.23[]{#_Toc31671 .anchor} David base auto start -- Radio
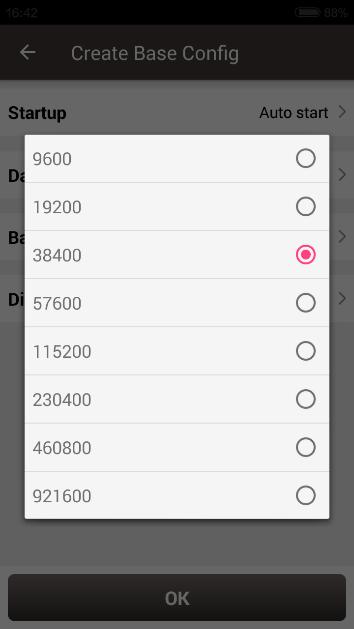
Figure 3.24[]{#_Toc9506 .anchor} Baud rate options
The detailed information of how to use radio refers to User Manual for David GNSS Receiver.
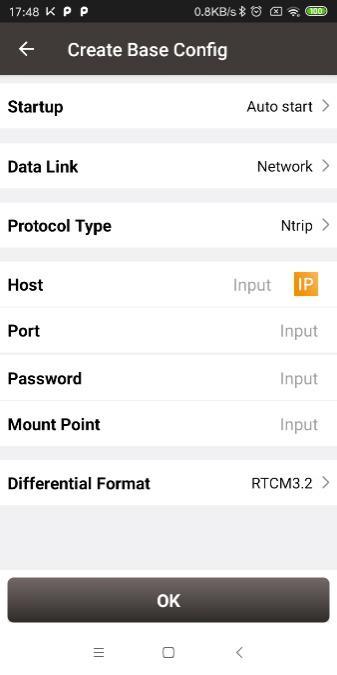
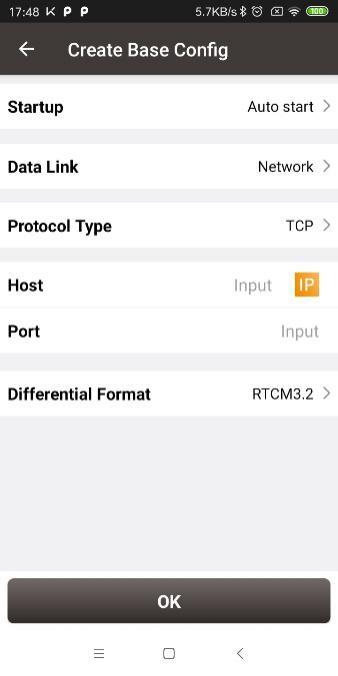
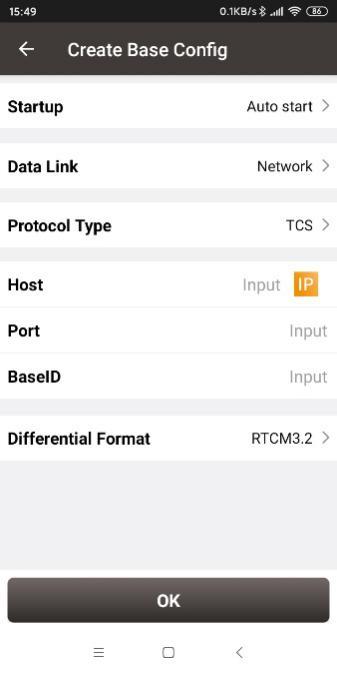
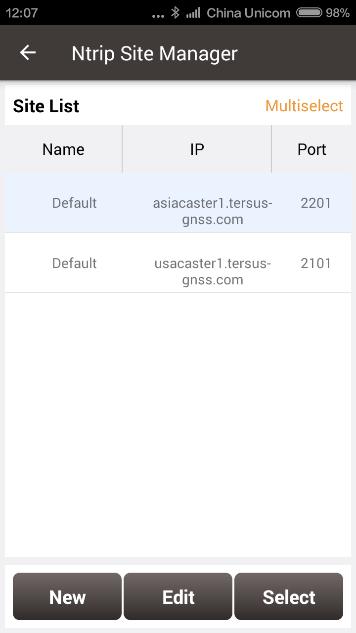
In the figure below, for auto start in network mode, the host IP can be manually typed or selected by clicking the icon ![]() on the right of row Host. It shows two Ntrip servers built by Tersus GNSS Inc. and can be selected depending on different area. Please contact Tersus technical support fot the two Ntrip servers. The site list can added, edited and deleted. For Ntrip network, host IP, port, password and mount point should be input. The mount point can be customized, and it is generally recommended to enter [the last four digits of the device's SN] as the mount point to distinguish. For TCP network, host IP and port should be input. TCS is a unique protocol from Tersus, the software automatically obtains the SN of current device as base ID. Contact Tersus technical support for password and mount point information if you bought products from Tersus.
on the right of row Host. It shows two Ntrip servers built by Tersus GNSS Inc. and can be selected depending on different area. Please contact Tersus technical support fot the two Ntrip servers. The site list can added, edited and deleted. For Ntrip network, host IP, port, password and mount point should be input. The mount point can be customized, and it is generally recommended to enter [the last four digits of the device's SN] as the mount point to distinguish. For TCP network, host IP and port should be input. TCS is a unique protocol from Tersus, the software automatically obtains the SN of current device as base ID. Contact Tersus technical support for password and mount point information if you bought products from Tersus.
+----------------------------------------------------------------------------------------------------------------------------------------------+----------------------------------------------------------------------------------------------------------------------------------------------+
|  |
|  |
| | |
| Figure 3.25[]{#_Toc5064 .anchor} David base auto start -- Ntrip | Figure 3.26[]{#_Toc28945 .anchor} David base auto start -- TCP |
+----------------------------------------------------------------------------------------------------------------------------------------------+----------------------------------------------------------------------------------------------------------------------------------------------+
|
| | |
| Figure 3.25[]{#_Toc5064 .anchor} David base auto start -- Ntrip | Figure 3.26[]{#_Toc28945 .anchor} David base auto start -- TCP |
+----------------------------------------------------------------------------------------------------------------------------------------------+----------------------------------------------------------------------------------------------------------------------------------------------+
+------------------------------------------------------------------------------------------------------------------------------------------------+---------------------------------------------------------------------------------------------------------------------------------------------+
| >  |
|  |
| > | |
| > Figure 3.27[]{#_Toc12862 .anchor} David base auto start -- TCS | Figure 3.28[]{#_Toc7109 .anchor} Ntrip Site Manager |
+------------------------------------------------------------------------------------------------------------------------------------------------+---------------------------------------------------------------------------------------------------------------------------------------------+
|
| > | |
| > Figure 3.27[]{#_Toc12862 .anchor} David base auto start -- TCS | Figure 3.28[]{#_Toc7109 .anchor} Ntrip Site Manager |
+------------------------------------------------------------------------------------------------------------------------------------------------+---------------------------------------------------------------------------------------------------------------------------------------------+
Ntrip status viewing method when the base station is connected to Ntrip server:
Take asiacaster for example, open any browser on the computer (accessible to internet) and enter the following URL in the address bar:
http://asiacaster1.tersus-gnss.com:2201/Ntrip.html?usr=[username]&pwd=[password]
in which, the [username] and [password] should be obtained from Tersus GNSS Inc.
In the figure above, for manual start in radio mode, the base coordinate should be typed manually or obtained by clicking ![]() the location icon or imported from the survey point library by clicking
the location icon or imported from the survey point library by clicking ![]() the list icon. The other parameters setting is the same with that in auto start radio mode.
the list icon. The other parameters setting is the same with that in auto start radio mode.
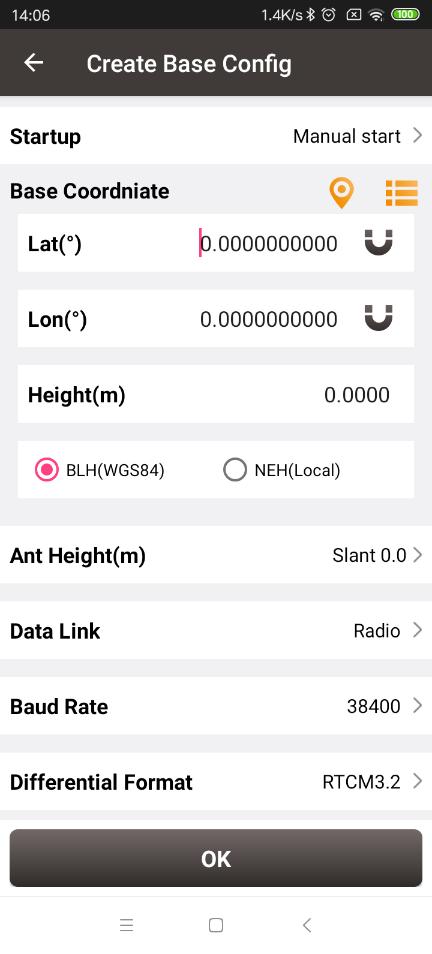
Figure 3.29[]{#_Toc1199 .anchor} David base manual start -- Radio
In the figure below, for manual start in network mode, the base coordinate setting is the same with the method mentioned above, the network host setting is the same with the method described for auto start in network mode.
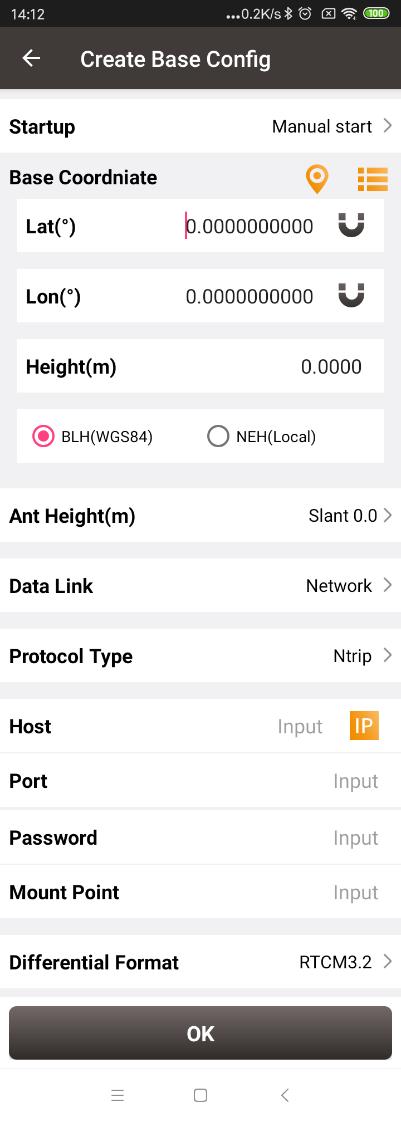
Figure 3.30[]{#_Toc424 .anchor} David base manual Start -- Network
Set Oscar / Luka as a Base
The detailed description for each configuration of Oscar / Luka as a base is shown in below screenshots.
Click [New] to create a new base configuration.
When the startup mode is Auto start, the "Keep coordinates after reboot" checkbox appears. If it is checked, receiver will keep the base station mode after reboot and the base station coordinates will be the same as before reboot. If it is unchecked, receiver will keep the base station mode, but the base station coordinates will be regenerated by single positioning.
When the startup mode is Manual start, the "Keep mode after reboot" checkbox appears. If it is checked, receiver will keep the base station mode and keep the base station coordinates. If it is unchecked, receiver will be in single mode after reboot.
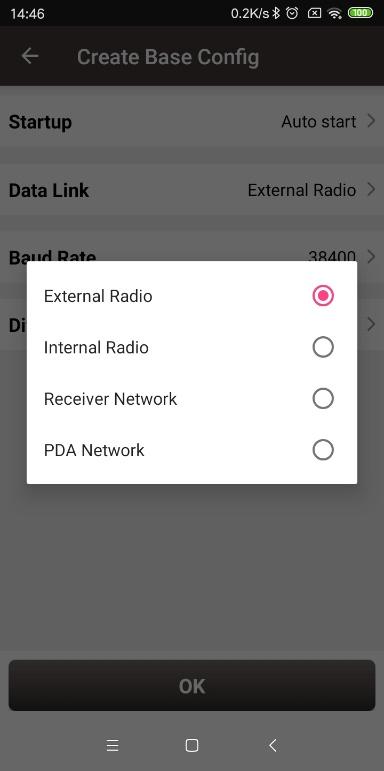
Figure 3.31[]{#_Toc7659 .anchor} Oscar / Luka base auto start -- 4 data link options
-
External Radio: the configuration method of base with external radio is similar with that of David base with radio stated above. The difference is that the default serial baud rate is 115200bps.
-
Internal Radio: if choosing to use the internal radio, user needs to select proper air baud rate, transmitting power, protocol, channel and frequency. It also displays the modulation type and bandwidth. The call sign parameters can be configured for the internal radio. The customers in some countries or areas can configure call sign function according to requirement.
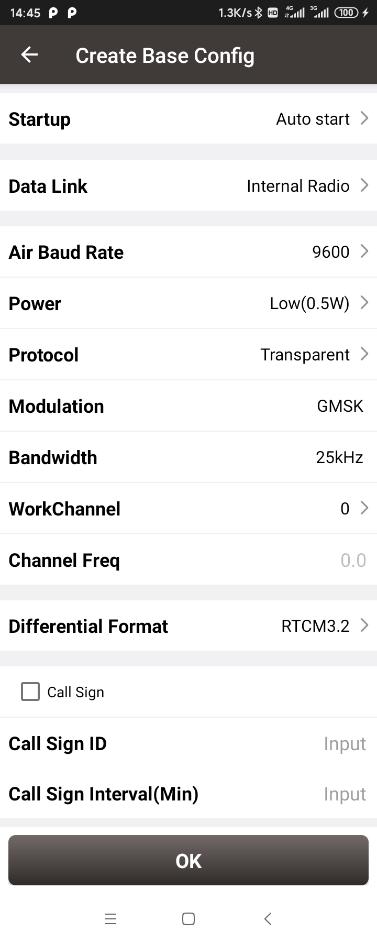
Figure 3.32[]{#_Toc14383 .anchor} Oscar / Luka base auto start -- internal radio
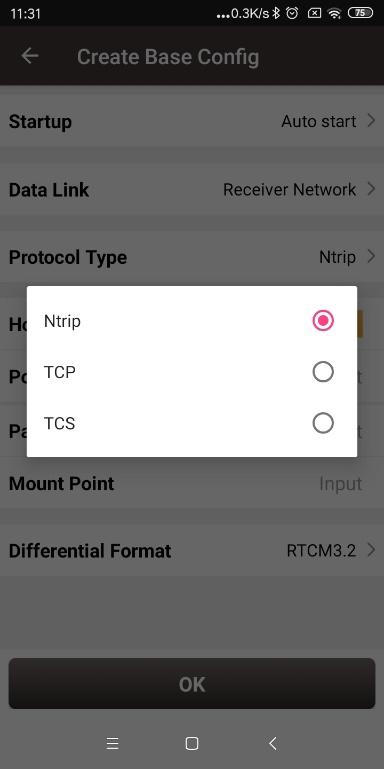
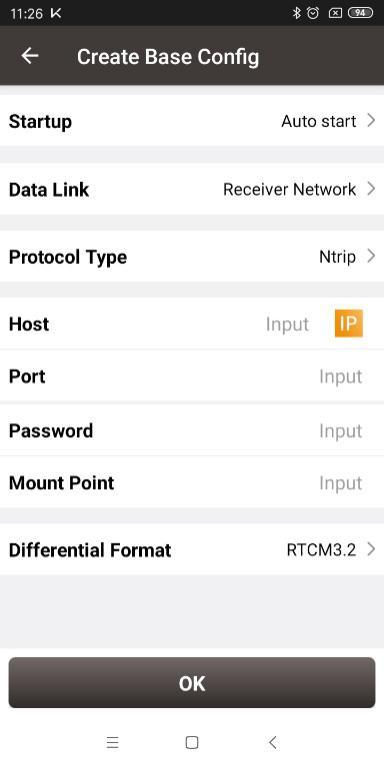
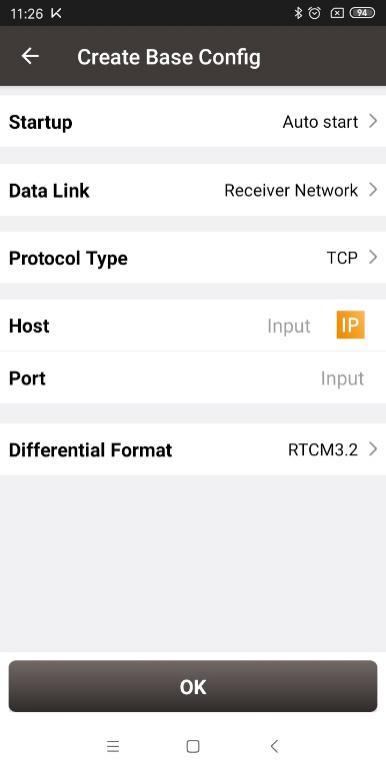
- Receiver Network: if choosing to use receiver network to transmit corrections, there are three protocol options to select: Ntrip, TCP and TCS (Tersus Caster Service). Fill in the corresponding IP address, port, password, mount point and base ID if necessary to connect to the receiver network.
+----------------------------------------------------------------------------------------------------------------------------------------------+----------------------------------------------------------------------------------------------------------------------------------------------+
|  |
|  |
| | |
| Figure 3.33[]{#_Toc3122 .anchor} Oscar / Luka base auto start -- receiver network options | Figure 3.34[]{#_Toc30126 .anchor} Oscar / Luka base auto start -- Ntrip network |
+----------------------------------------------------------------------------------------------------------------------------------------------+----------------------------------------------------------------------------------------------------------------------------------------------+
|
|
| | |
| Figure 3.33[]{#_Toc3122 .anchor} Oscar / Luka base auto start -- receiver network options | Figure 3.34[]{#_Toc30126 .anchor} Oscar / Luka base auto start -- Ntrip network |
+----------------------------------------------------------------------------------------------------------------------------------------------+----------------------------------------------------------------------------------------------------------------------------------------------+
|  |
|  |
| | |
| Figure 3.35[]{#_Toc8101 .anchor} Oscar / Luka base auto start -- TCP network | Figure 3.36[]{#_Toc11120 .anchor} Oscar / Luka base auto start -- TCS network |
+----------------------------------------------------------------------------------------------------------------------------------------------+----------------------------------------------------------------------------------------------------------------------------------------------+
|
| | |
| Figure 3.35[]{#_Toc8101 .anchor} Oscar / Luka base auto start -- TCP network | Figure 3.36[]{#_Toc11120 .anchor} Oscar / Luka base auto start -- TCS network |
+----------------------------------------------------------------------------------------------------------------------------------------------+----------------------------------------------------------------------------------------------------------------------------------------------+
- PDA Network: there are also three protocol options of PDA network to select: Ntrip, TCP and TCS (Tersus Caster Service). The required information to input for different protocol is different, refer to the screenshots above.
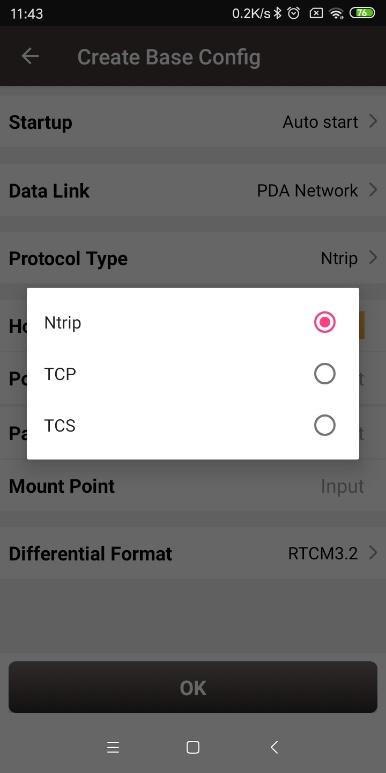
Figure 3.37[]{#_Toc29947 .anchor} Oscar / Luka base auto start -- PDA network options
For Oscar / Luka manual start in radio mode and network mode, the base coordinate should be typed manually or obtained by clicking ![]() the location icon or imported from the survey point library by clicking
the location icon or imported from the survey point library by clicking ![]() the list icon. The data link options configuration are the same with the method mentioned above in Oscar / Luka base auto start in radio and network modes.
the list icon. The data link options configuration are the same with the method mentioned above in Oscar / Luka base auto start in radio and network modes.
Rover
Some default rover configurations are provided for David and Oscar / Luka. Select a configuration file in the Work Mode List and click [Detail] to edit the rover configuration. Click [Start] to complete the rover configuration.
Set David as a Rover
The detailed description for each configuration of David as a rover is shown in below screenshots.
Click [New] to create a new rover configuration. In Figure 3.36 below, for rover configuration in radio mode, the baud rate is 38400 by default and can be selected from 9600 to 921600 in the pop-up list as shown in Figure 3.24.
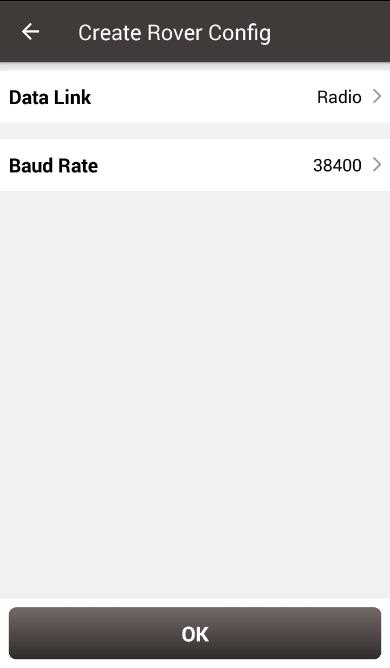
Figure 3.38[]{#_Toc1543 .anchor} Create Rover Configuration for David -- Radio
In Figure 3.37 below, for rover configuration in network mode, the protocol type can be selected from Ntrip, TCP and TCS.
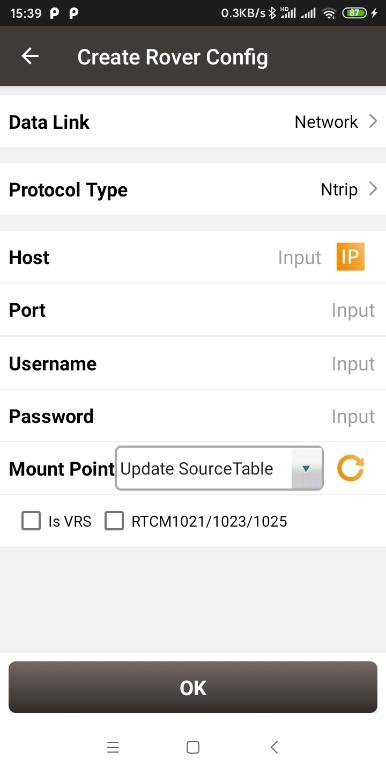
Figure 3.39[]{#_Toc6261 .anchor} Create Rover Configuration for David -- Ntrip Network
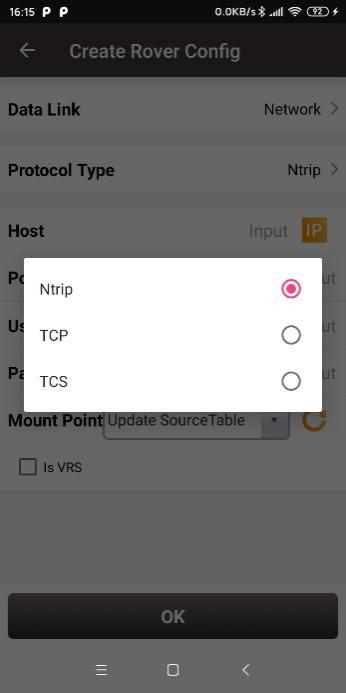
Figure 3.40[]{#_Toc18401 .anchor} Protocol type options
When Ntrip network is selected, the host can by manually typed or selected by clicking the icon ![]() on the right of row Host as mentioned in Figure 3.28 above. The username and password should be obtained from Tersus technical support. The box on the right of Mount Point displays the mount point and differential format after clicking the refresh icon
on the right of row Host as mentioned in Figure 3.28 above. The username and password should be obtained from Tersus technical support. The box on the right of Mount Point displays the mount point and differential format after clicking the refresh icon ![]() to update the source table. The example is shown below. If the connected CORS broadcasts the RTCM1021/1023/1025 coordinate system data, after solving the data, Nuwa app will ask whether to replace the coordinate system parameter in the current project.
to update the source table. The example is shown below. If the connected CORS broadcasts the RTCM1021/1023/1025 coordinate system data, after solving the data, Nuwa app will ask whether to replace the coordinate system parameter in the current project.
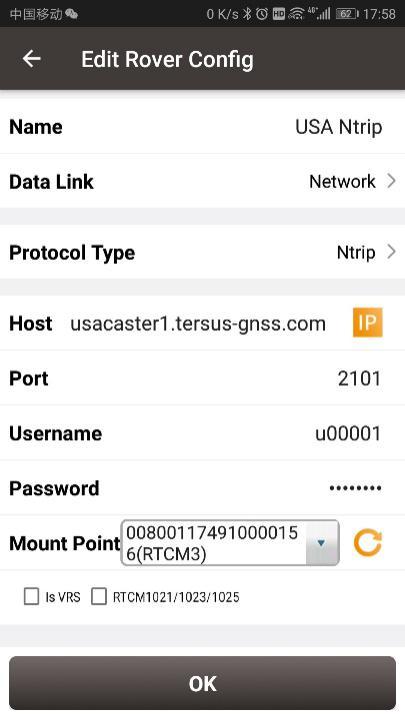
Figure 3.41[]{#_Toc21780 .anchor} Edit Rover Configuration
When TCP is selected for protocol type, fill in the information of host and port according to customer requirements to complete the configuration.
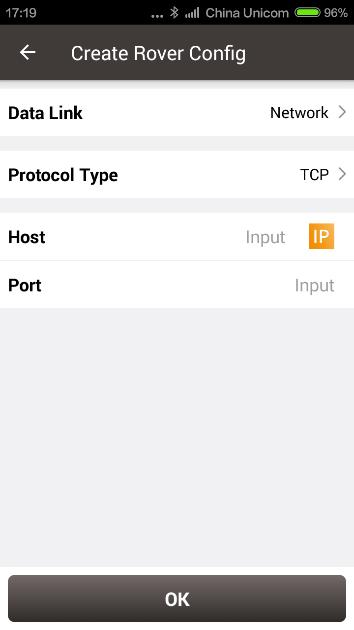
Figure 3.42[]{#_Toc12828 .anchor} Create Rover configuration for David -- TCP Network
When TCS is selected for protocol type, fill in the information of host, fill in the base ID and it will obtain differential correction data from designated base station.
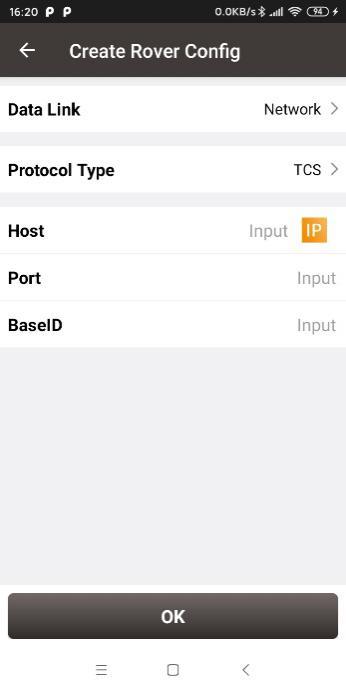
Figure 3.43[]{#_Toc1033 .anchor} Create Rover configuration for David -- TCS network
Set Oscar / Luka as a Rover
The detailed description for each configuration of Oscar / Luka as a rover is shown in below screenshots.
Click [New] to create a new rover configuration. It shows the rover configuration using the internal radio of Oscar / Luka as below. Choose appropriate baud rate, communication protocol, work channel and channel frequency. Click [OK] and type the configuration name to complete creating a rover configuration of Oscar / Luka.
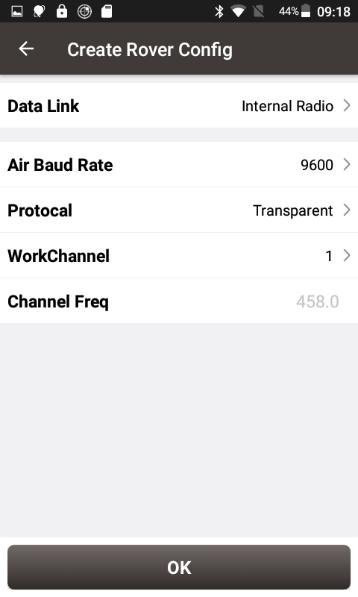
Figure 3.44[]{#_Toc28571 .anchor} Create Rover Configuration for Oscar / Luka -- Internal Radio
The data link can be selected from an option list: Internal Radio, Receiver Network and PDA Network shown as below.
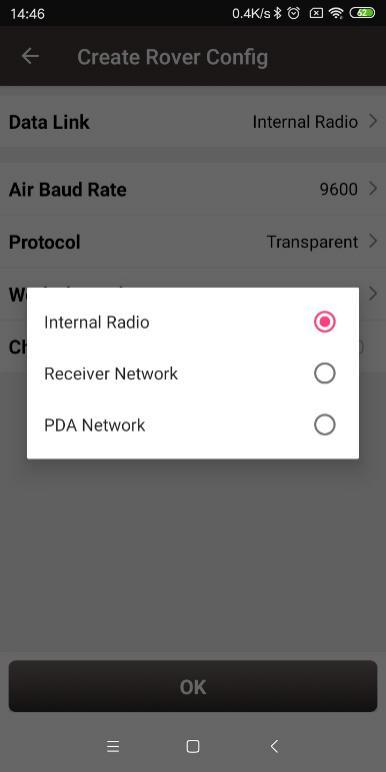
Figure 3.45[]{#_Toc28781 .anchor} Oscar / Luka rover data link options
When Receiver Network is selected for rover communication, there are three protocol options to select: Ntrip, TCP and TCS (Tersus Caster Service). Fill in the corresponding host, port, password, mount point and base ID if necessary to connect to the receiver network.
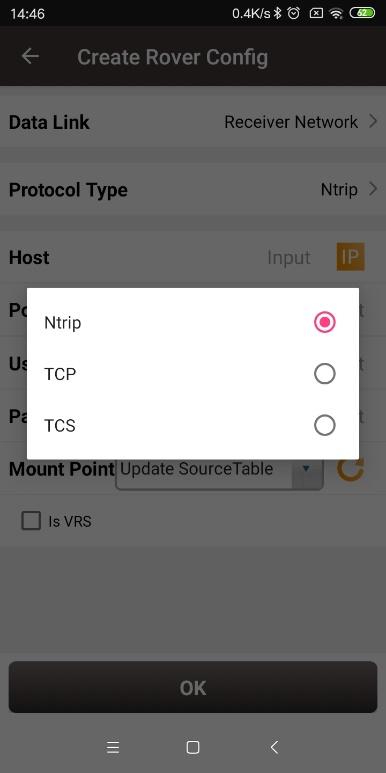
Figure 3.46[]{#_Toc9408 .anchor} Oscar / Luka rover using receiver network -- protocol options
When PDA Network is selected for rover communication, there are also three protocol options of PDA network to select: Ntrip, TCP and TCS (Tersus Caster Service).
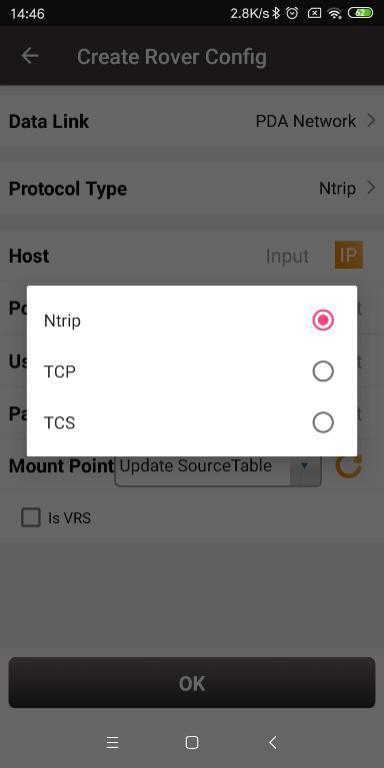
Figure 3.47[]{#_Toc19934 .anchor} Oscar / Luka rover using PDA network -- protocol options
When selecting Ntrip as the protocol type, if Is VRS is checked, the new base will no longer be prompted and recorded when the coordinates of the base change.
When selecting Ntrip as the protocol type, if the CORS service broadcasts RTCM1021 (ellipsoid and datum parameters), RTCM1023 (residual grid) or RTCM1025(projection parameters), then check these check boxes, and after receiving these data and solving them, Nuwa will ask to replace the coordinate system parameters in the current project. If checked (all are checked by default), but the data is not actually parsed, it will not affect the parameters.
NMEA Output
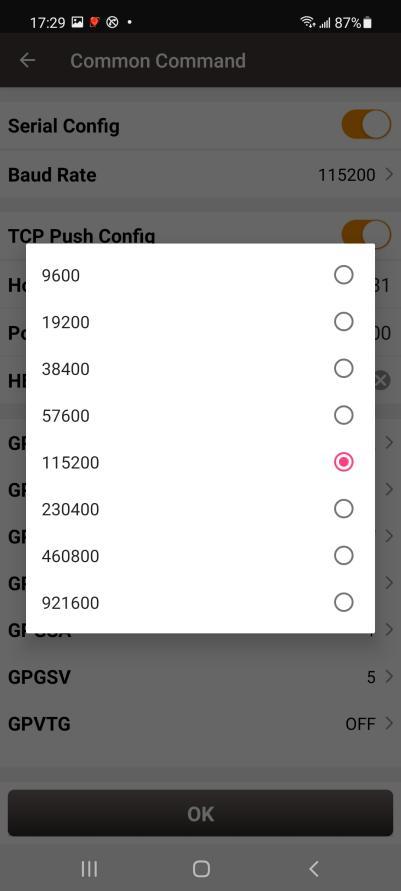
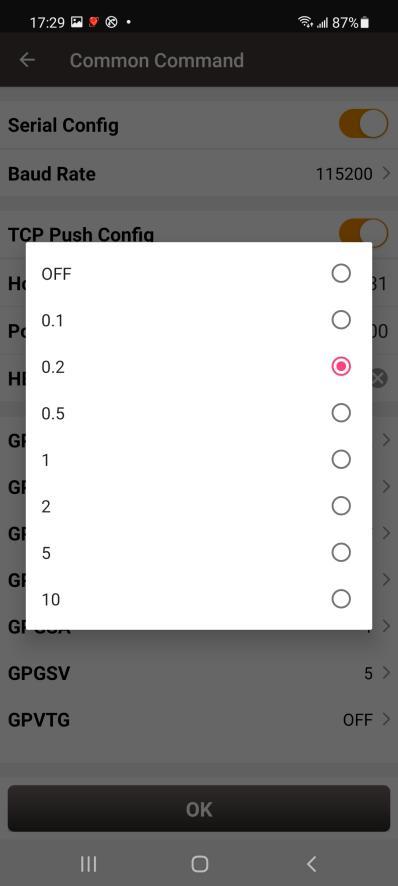
The NMEA output function is only available when Oscar receiver or Luka receiver is connected. NMEA data output via serial port and TCP are currently supported. The baud rate can be selected in the pop-out list from 9600 to 921600 bps. Parameters such as Host and Port of the TCP server and Header can be configured. The frequency of output NMEA data can be selected in the pop-out list.
+----------------------------------------------------------------------------------------------------------------------------------------------------------------+---------------------------------------------------------------------------------------------------------------------------------------------------------------+----------------------------------------------------------------------------------------------------------------------------------------------------------------+
|  |
|  |
|  |
| | | |
| Figure 3.48[]{#_Toc3746 .anchor} NMEA Output | Figure 3.49[]{#_Toc5179 .anchor} Baud rate options | Figure 3.50[]{#_Toc18804 .anchor} Frequency options |
+----------------------------------------------------------------------------------------------------------------------------------------------------------------+---------------------------------------------------------------------------------------------------------------------------------------------------------------+----------------------------------------------------------------------------------------------------------------------------------------------------------------+
|
| | | |
| Figure 3.48[]{#_Toc3746 .anchor} NMEA Output | Figure 3.49[]{#_Toc5179 .anchor} Baud rate options | Figure 3.50[]{#_Toc18804 .anchor} Frequency options |
+----------------------------------------------------------------------------------------------------------------------------------------------------------------+---------------------------------------------------------------------------------------------------------------------------------------------------------------+----------------------------------------------------------------------------------------------------------------------------------------------------------------+
Device
3.6.1 David's device information
When Nuwa is connected with David GNSS Receiver, click [Device] -> [Device] to view the detailed information of David.
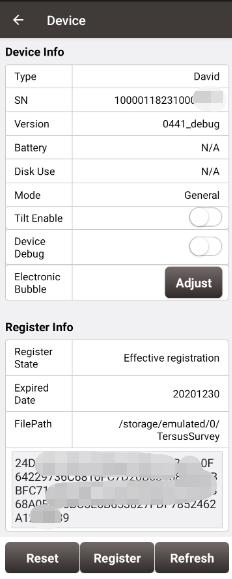
Figure 3.51[]{#_Toc1224 .anchor} David's device info
In the figure above, the SN row displays complete serial number for David, the battery and disk use are not available. Mode indicates working mode which includes General, Base, and Rover. Tile Enable and Electronic Bubble are not available and cannot be turned on.
When the David receiver has an unknown error, turning on Device Debug to record Tersus specific data to troubleshoot receiver which can help us better improve receiver's function.
Note: This function and static survey cannot be turned on at the same time. Please manually turn off the static survey before using Device Debug.
Registration
When the registration is not effective, follow below steps to complete the registration.
-
Connect the TC20 controller to PC with a mini USB cable, and choose "Use USB for Transfer files" on the TC20 screen.
-
Click TC20 -> Internal storage -> TersusSurvey on the PC, then copy the license file (obtained from Tersus Technical Support) to the "TersusSurvey" folder.
-
Open Nuwa software, click [Register] in Device information interface. Click [Refresh] to update the registration status.
Note:
a. The registration file is text format file saved as xxx.txt.
b. David's registration file name is the same with the SN number. The example is as below.
 Figure 3.52[]{#_Toc12244 .anchor} Example of David's registration file
Clicking [Reset] resets the receiver into factory settings.
3.6.2 Oscar / Luka 's device information
When Nuwa is connected with Oscar GNSS Receiver or Luka GNSS Receiver, click [Device] -> [Device] to view the detailed information of Oscar / Luka.
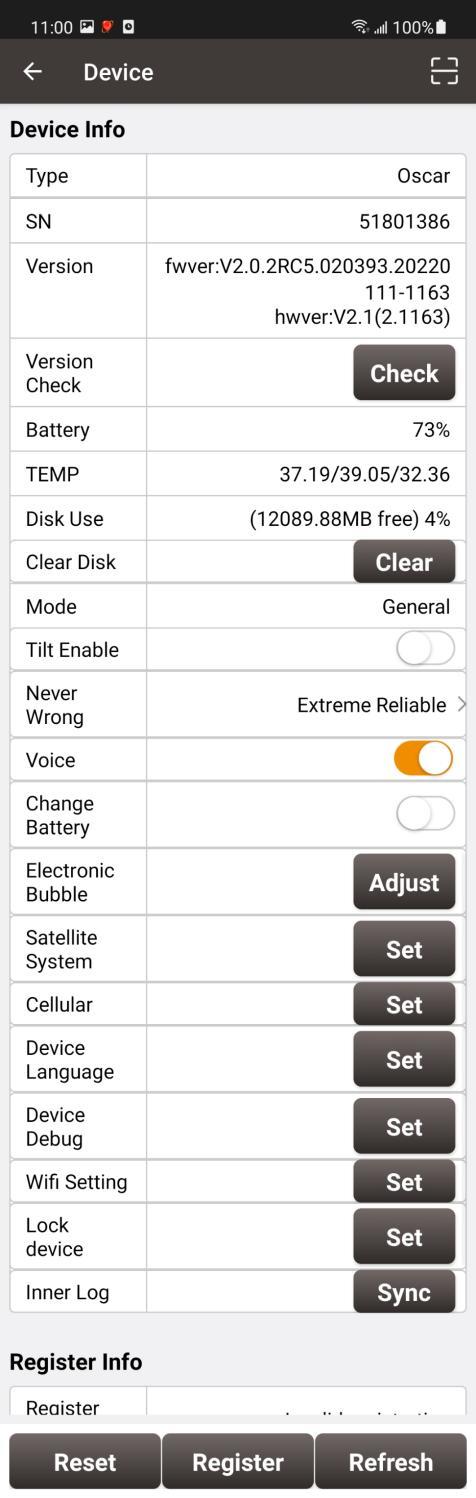
Figure 3.53[]{#_Toc31659 .anchor} Oscar's device info
In the figure above, only displays 8 digits number for receiver which is used for Bluetooth pairing, registration, TCS connection, and etc.
Click Version Check [Check], connecting to the server by PDA network or GSM module in receiver, to check whether the firmware needs to be upgraded. If the firmware needs to be upgraded, the word "new" will be displayed, and click "new" to download the latest version of firmware through receiver 4G / WIFI network and upgrade the firmware.
The battery row displays remaining battery level for receiver. The disk row shows receiver disk usage and remaining space. The mode row displays current working mode, which includes General, Base and Rover.
Tilt Enable is the tilt compensation applicable for Oscar GNSS receiver Ultimate version, Luka GNSS receiver Ultimate version and Luka GNSS receiver Advanced version. The detailed usage of this function refers to 4.4 Tilt Survey and Stakeout.
IMU Calibration is the tilt compensation applicable for Oscar GNSS receiver Ultimate version, Luka GNSS receiver Ultimate version and Luka GNSS receiver Advanced version. When the tilt enable is turned on, the error of the IMU and the pole can be calibrated by repeatedly tilting the pole at a point with known coordinates. This function may affect the accuracy of tilt measurement. Please only use it with caution after consulting Tersus, otherwise you will bear the consequences.
RTK Engine Mode:
[Rapid Fix]: With it, you can get stable fixed solutions much faster. The fixed threshold is slightly lower, and so is the confidence of the results.
[Extreme Reliable]: The results are very reliable, but it may take some time to get fixed solutions, especially in a challenging environment. The fixed threshold is high, and so is the confidence of the results.
[Balance]: It is the default setting, and the effect is somewhere in between the above two modes.
When Voice feature is turned on, receiver will voice over when the power is switched on and off, when Bluetooth is connected and disconnected, when the solution status is fixed and floating, and when the working mode changes.
When the battery change mode is turned on, turn off the receiver, replace the battery and restart the device, and it will maintain the working mode before shutting down; if the base station is in auto start mode before shutting down, the original auto-start base station coordinates will be maintained; if the base station is started at a known point before shutting down, it will keep the mode of starting at the known point; if it was at rover mode before shutting down, it will keep the rover mode after changing battery.
Electronic Bubble (eBubble)
This function is only available for Oscar GNSS Receiver and Luka GNSS Receiver. Make the body of the receiver stand on a leveled Tribrach before eBubble calibration.
Click ![]() on the right of electronic bubble to adjust bubble. On the screenshot below, the eBubble is not in the black circle and its color is red for warning purpose.
on the right of electronic bubble to adjust bubble. On the screenshot below, the eBubble is not in the black circle and its color is red for warning purpose.
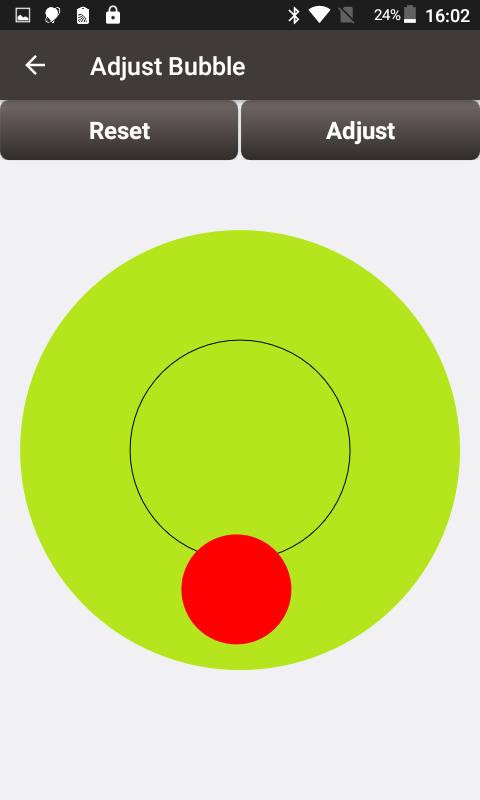
Figure 3.54[]{#_Toc4260 .anchor} eBubble before adjusting
Click ![]() on the right, the eBubble is calibrated to the center inside the black circle and the bubble color turns blue.
on the right, the eBubble is calibrated to the center inside the black circle and the bubble color turns blue.
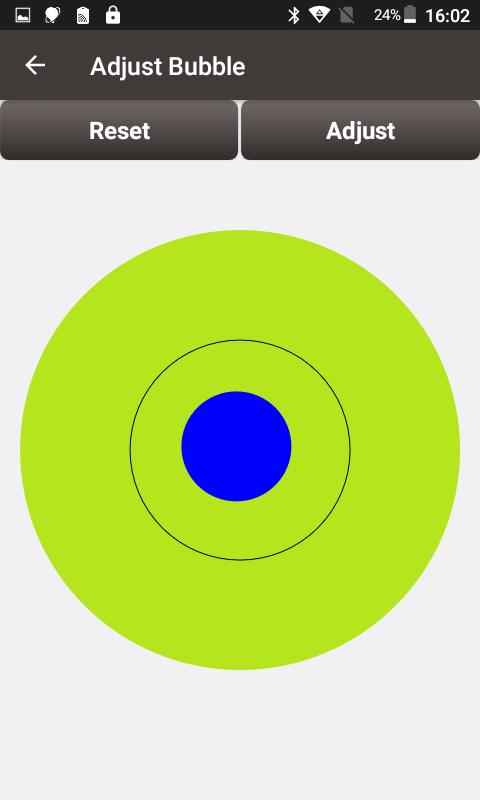
Figure 3.55[]{#_Toc23944 .anchor} eBubble after adjusting
Click Satellite System [Set], to select the system of satellite tracking for the receiver.
Click Cellular [Set], to view the status and configure the APN of network module in receiver.
Click Device Language [Set], to configure panel display language and voice language of receiver.
Click Device Debug [Set], to determine whether each module inside receiver needs to record the log information.
Click Wifi Setting [Set], to set Wifi module of receiver to OFF, AP mode or STA mode.
Click Lock device [Set], to set the password of receiver. After the password setting, a password should be entered for verification when connecting to the receiver. Click Unlock to cancel the password setting.
Click the Inner Log [Sync], after connecting the USB flash drive to the receiver through the OTG cable, to copy the logs recorded in receiver to the USB flash drive and then provide it to Tersus to verify and solve various problems that occurred in the field.
Registration
When the registration is not effective, there are two methods to complete the registration.
One is using USB cable and a computer.
-
Connect the TC20 controller to PC with a mini USB cable, and choose "Use USB for Transfer files" on the TC20 screen.
-
Click TC20 -> Internal storage -> TersusSurvey on the PC, then copy the license file (obtained from Tersus Technical Support) to the "TersusSurvey" folder.
-
Open Nuwa software, click [Register] in Device information interface. Click [Refresh] to update the registration status.
Note:
a. The registration file is text format file saved as xxx.txt.
b. The registration file name consists of the first three digits and the last five digits of the SN number. The example is as below.
 Figure 3.56[]{#_Toc2388 .anchor} Example of registration file
The other method is registering using QR code.
Click the scan button at the top right of the device information interface and directly scan the QR code provided by Tersus to complete the registration.
Clicking [Reset] resets the receiver into factory settings.
TAP
When connecting to the device with TAP service, such as Oscar-TAP or David30-TAP, enter TAP module to start TAP working mode. Select LBAND or LBAND + Network as the data link to get PPP fixed solution.
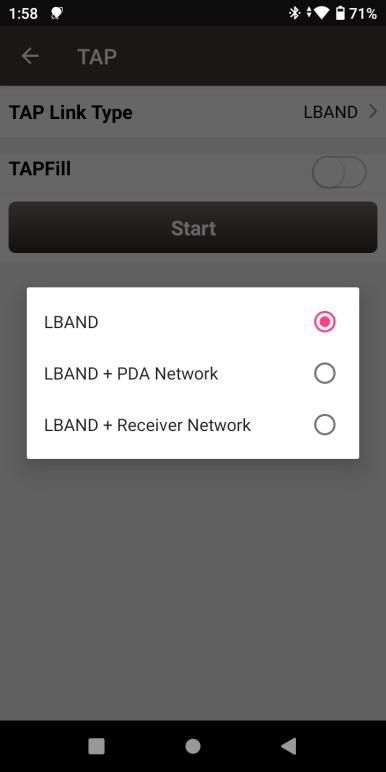
Figure 3.57[]{#_Toc25579 .anchor} TAP data link
When selecting LBAND as the link type, if TAP Fill is turned on, the RTK configuration with radio or network link also needs to be selected before starting the mode. After starting, the receiver will automatically calculate frame and epoch of the TAP result into those where the RTK result is located, and switch to TAP result output if RTK cannot be fixed.
After starting TAP mode, it displays Expire Date of TAP service, serial number, TAP satellite sky map and CN0, Error Rate (ERR) data. The open sky error rate is generally less than 1‰; when there is some blockage the error rate may be between 1‰ and 10‰; when the error rate is greater than 10‰ or the satellite is displayed in gray there may be a serious or complete blockage, which is generally difficult to get fixed result and is likely to affect the TAP service registration information through TAP satellites.
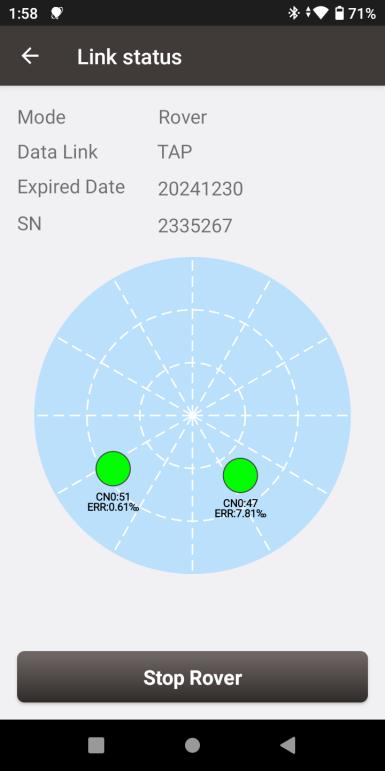
Figure 3.58[]{#_Toc21860 .anchor} TAP satellites sky map