General Operations
This chapter describes the detailed operations for the watchdog interface and the main interface.
Watch Ntrip Caster
2.1.1 Introduction
The Watch Ntrip Caster interface provides watch dog function for GeoCaster. The interface contains three parts:
- Alert Management
This area lists the information of Ntrip users, alert rate, alert valid time, phone number and mount point.
- Action Trace
This area lists the details of time, action, target and information.
- SMS Notification
This area sets up the telephone number for the SMS notification. For Chinese mobile, type the mobile number directly. For the users out of China, the notification number should use the format of 00 + country code + mobile number. For example, to notify a Singapore user, type 006512345678.
Generally, the Watch Ntrip Caster interface is for monitoring and notification. It is not recommend closing watchdog when GeoCaster is running.
2.1.2 Operations
The Watch Ntrip Caster is operating as shown below when there are a number of Ntrip users for management and monitoring.

Figure 2.1[]{#_Toc25961 .anchor} WatchNtripCaster in operation
If GeoCaster is closed accidentally, WatchNtripCaster will launch GeoCaster automatically and it has a record in the Action Trace area.
Contact Tersus Technical Support by email support@tersus-gnss.com for more information about the watchdog.
GeoCaster Main Interface
Introduction
The GeoCaster main interface contains four major information output areas which are shown as below.
Figure 2.2[]{#_Toc30430 .anchor} Information output area in GeoCaster
- Server/Client Name
This area lists the servers which are sending RTCM stream to the NTRIP caster and the clients which are receiving RTCM stream from the NTRIP caster. The name consists of mount point, password, and user name.
- Connect Info
This area presents the connect information of the server or client selected. The connect information includes: Start Time, Receive Bytes (KB), Send Bytes (KB), Skip Send, RTCM Type, GGA Info, Error / Valid Package (Total) and Latitude / Longitude / Height.
- Login User
This area lists the information of logged in users which include user (user name and password), number of Ntrip Client, number of Ntrip Server, max number of Ntrip Client, and max number of Ntrip Server.
- Log Console
This area presents the logs and information for every operation step, such as client is connected, client is aborted, responses, and etc.
Operations
The GeoCaster is operating as shown below when there are a number of Ntrip users are sending RTCM stream to this Ntrip Caster.
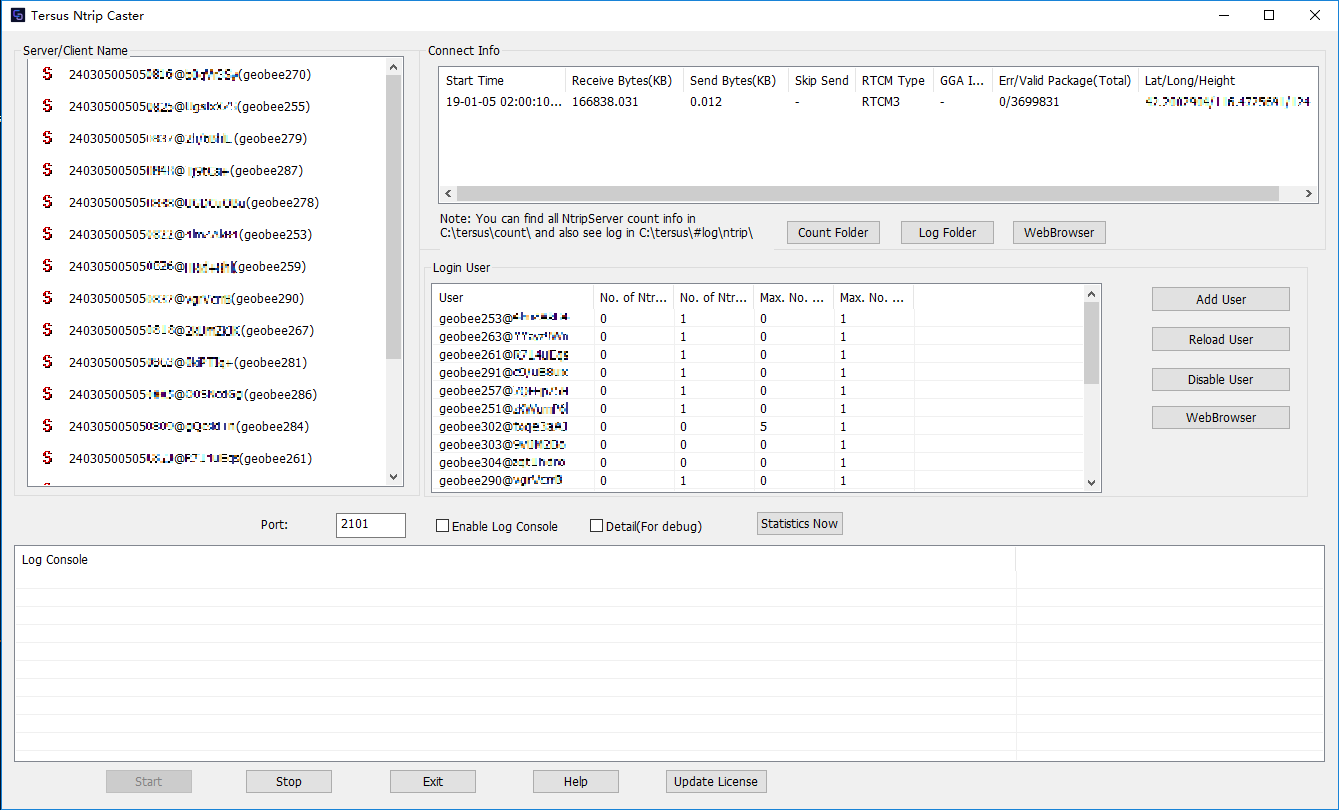
Figure 2.3[]{#_Toc885 .anchor} GeoCaster in operation
Under the connect info area, there are three functional buttons:
- Count Folder
Click this button and the count folder will pop out as below. The count information is saved in a text file very hour.
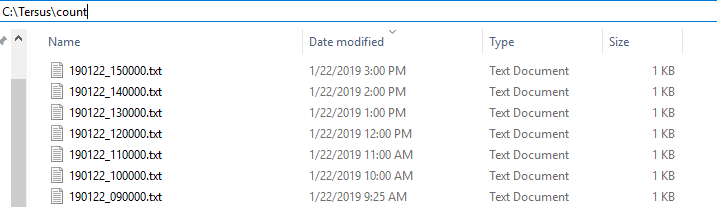
Figure 2.4[]{#_Toc7829 .anchor} Count Folder
- Log Folder
Click this button and the log folder will pop out as below. The log information is saved in a .log file which can be opened with notepad.
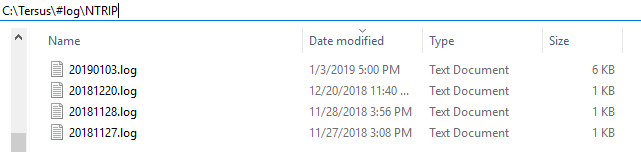
Figure 2.5[]{#_Toc15786 .anchor} Log Folder
- WebBrowser
Click this button and the default browser with link status for the selected mount point will pop out as below.
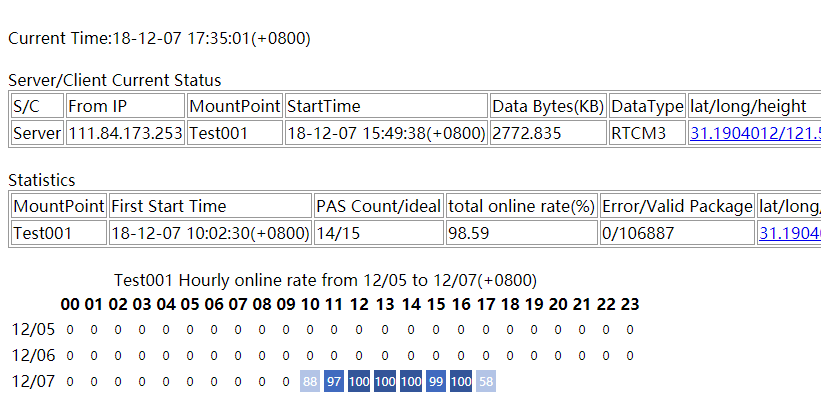
Figure 2.6[]{#_Toc7768 .anchor} Link status in web browser
On the right side of login user area, there are four functional buttons:
- Add User
Click this button, it pops out the user manage window which is shown below.
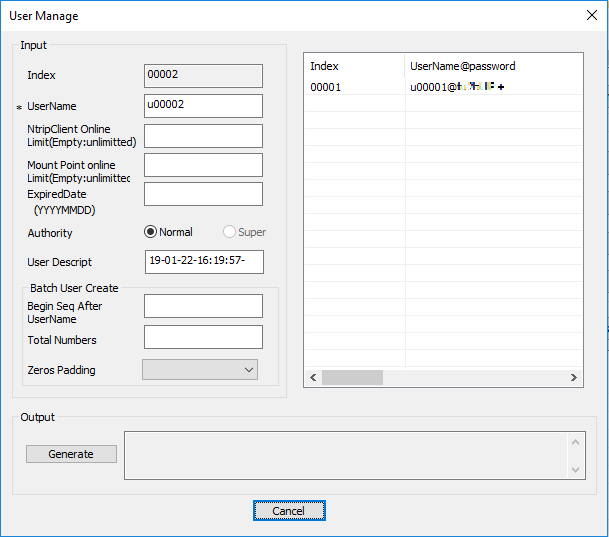
Figure 2.7[]{#_Toc3943 .anchor} User Manage interface
The option with a star * is compulsory. Fill the configuration for a new user, click [Generate] to output the password for the newly created user.
- Reload User
This button is used to share the registered user information. If customer wants to share the user info to another machine, copy lic.dat/licdisablelist.dat to destination directory, then click [Reload User] to update information.
- Disable User
Select a user in the login user area if customer wants to disable it, and click [Disable User] to disable this user. Deleting user is not recommended.
- WebBrowser
Click this button and the default browser with link status for the selected user in the left login user area will pop out as below.
Figure 2.8[]{#_Toc14863 .anchor} Link status in web browser
- ShareGroup
Click this button and the default browser listing all share groups will pop out. The details refers to section 3.2.
Under the login user are, there are three options and one button:
- Port
The port number can be edited in this box.
- Enable Log Console
Check the box on the left of [Enable Log Console] can enable the output of log console window.
- Detail (For debug)
Check the box on the left of [Detail (For debug)] to view more details specifically for debug purpose.
- Get mount table without auth
By default, this box is not checked which means verification of user name and password are required when obtaining MountPoint from Tersus Caster. However, some software on the market do not require user name and password to acquire source table, and you may encounter that source table cannot be obtained. At this time, check the box to solve this problem.
- Statistics Now
Click the button [Statistics Now] to create current count file, additionally from the auto created count file every hour.
On the bottom of the GeoCaster interface, there are five buttons:
- Start
Generally this button is shaded when the GeoCaster is launched. If the software is turned off, click [Start] to turn on the GeoCaster service.
- Stop
Click [Stop] to turn off the GeoCaster service.
- Exit
Click [Exit] to close the GeoCaster software, however the WatchNtripCaster should be closed first.
- Help
Click [Help] to pop out the text file of readme.txt which includes questions and answers that customer may encountered.
- Update License
Click [Update License] to register GeoCaster for longer duration, contact Tersus Technical Support by email support@tersus-gnss.com for activation code.
- ViewMap
Click [ViewMap] to pop out the map indicating the location of the base station.
- Relay Config
Click [Relay Config] to pop out the relay function configuration interface shown as below. This is a data forwarding function, which can access data from other caster, and then run to Tersus Caster with the mount point of RELAY_xxx, for Client users to connect and receive data.
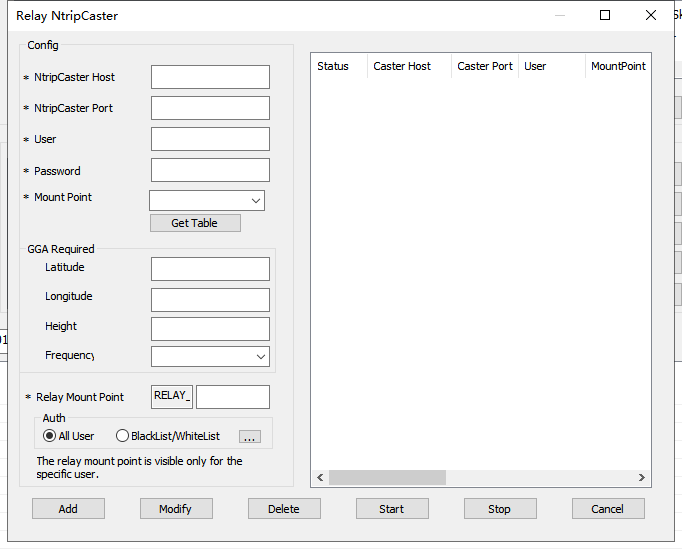
Figure 2.9[]{#_Toc13954 .anchor} Relay config interface
- SaveFile Config
Click [SaveFile Config] to save files for base streams, which means TersusCaster will storage the RTCM data streams from the base stations connecting to the Caster as several files, and convert to Rinex files automatically for post processing or sharing to others. The steps to configure the SaveFile function are as following:
(1) Click the SaveFile Config button to configure the function.
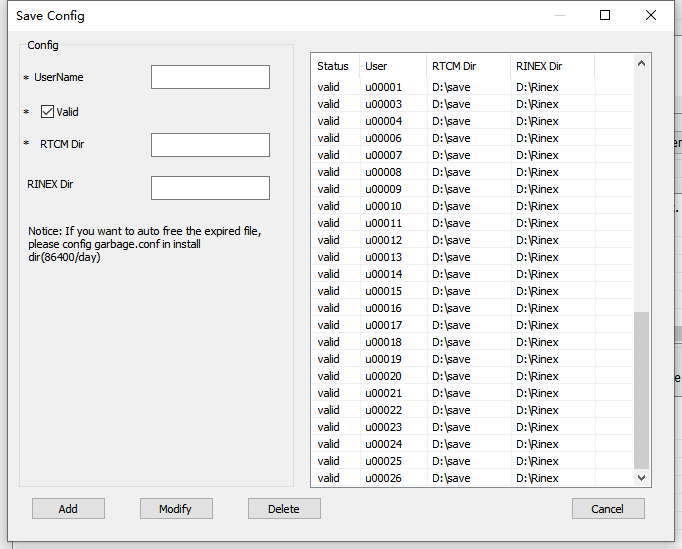
Figure 2.10[]{#_Toc19945 .anchor} SaveFile config interface
(2) Enter the correct parameters in the Save Config dialog box, and then click Add to add one base stream file saving record.
[UserName]: Username of Ntrip Server(Geobee) when configuring Ntrip Server(Geobee) to connect to Caster and push RTCM streams.
[Valid]: Check the checkbox to ensure that the saving record is valid.
[RTCM Dir]: Path of the folder where the base RTCM stream files are saved
[RINEX Dir]: Path of the folder where the Rinex files converted from RTCM files are saved.
Click Modify or Delete to modify or delete the record after selection one of them.
Note: Since the GPS time is required in the conversion from RTCM to Rinex, please configure the base station(Geobee) to ouput RTCM ephemeris data when you configure it, otherwise the Rinex conversion may not be successful.
(3) Check the RTCM files(.txt) under the RTCM Dir path username and mount point folder. Check the Rinex files under the RINEX Dir path username and mount point folder. The RTCM files and the Rinex files are both named by YYMMDD_HH, and files are saved per hour. The Rinex conversion program will start automatically to convert the RTCM files in the last hour.
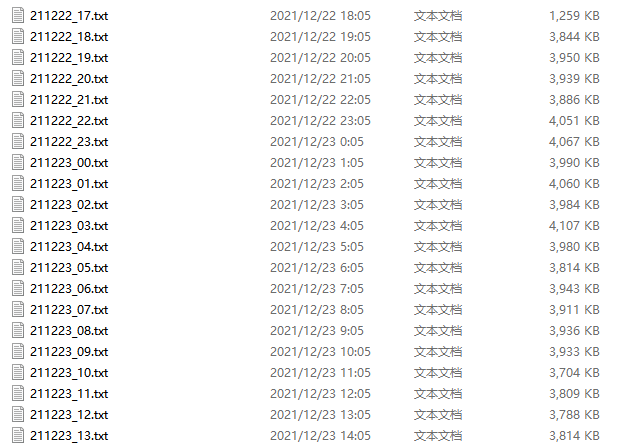 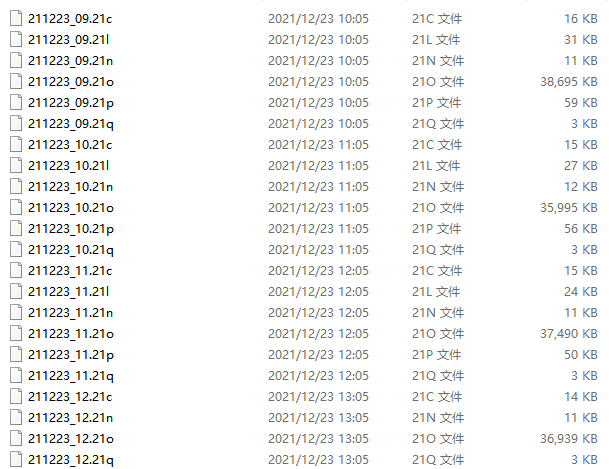
Figure 2.11[]{#_Toc7472 .anchor} RTCM and Rinex Files saved
(4) If you need to share Rinex files, configure the Rinex folder as the shared folder. And other users can access the path through shared folder and download the Rinex files.
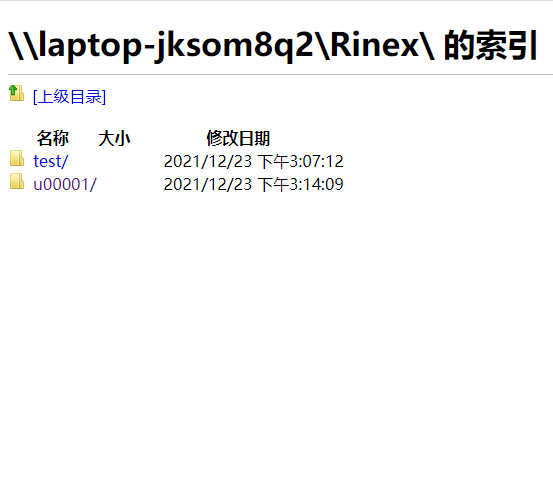 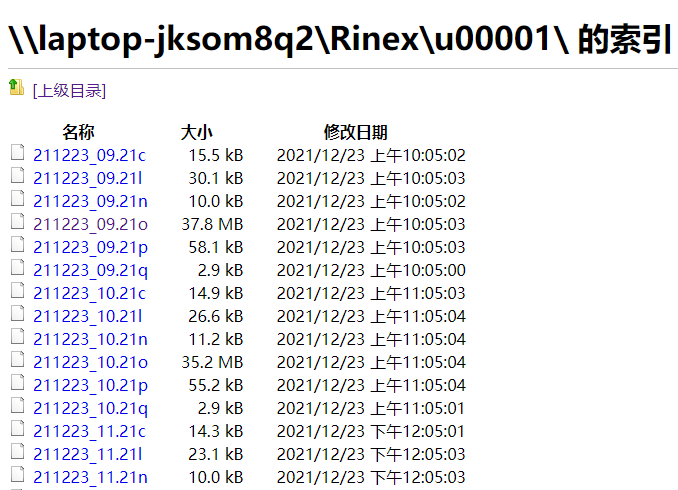
Figure 2.12[]{#_Toc10072 .anchor} RTCM and Rinex Files shared on FTP
(5) You can configure a function to delete old files automatically through garbage.conf under the installation path to save storage space.

Figure 2.13[]{#_Toc6949 .anchor} Add records in garbage.conf
As shown above, add records in garbage.conf. Configure the path of RTCM files and Rinex files, and NO SPACE is allowed in the path. Configure the judgment time for old files in seconds, which needs to be a multiple of 86400, and 86400 seconds means one day. The function will delete old files days ago automatically.