General operations
This chapter describes generation operations of Tersus GNSS Center software.
3.1 Connect to a BX RTK board
Before connecting the board with Tersus GNSS Center, please make sure the board is powered up and physically connected to the computer via its serial ports. The detailed to establish a physical connection between the board and PC can be found in the User Manual for BX series board or David series receiver. (Available at www.tersus-gnss.com/document). The following steps show how to do connect the Tersus GNSS Center software to the board:
-
Launch Tersus GNSS Center, the Config dialog pops up automatically. The dialog can also be found in menu bar Tools -> Config.
-
Choose Serial as Connection type and choose the correct port. The baud rate of the board is 115200 by default and changing baud rate is not recommended. The serial port can be found in your windows device manager.
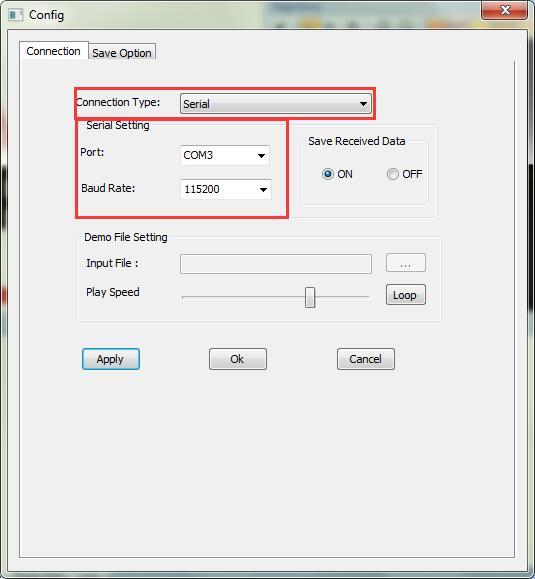
Figure 3.1[]{#_Toc31027 .anchor} Connection configuration
- Click [OK] to establish the connection. If the connection is established, the COMM indicator on the status bar will turn to green.
3.2 Configure RTK board with commands
Before starting field work, configure the RTK board or receiver with the Tersus GNSS Center software.
The board or receiver can be configured with commands which you can key in via the Text Console window of Tersus GNSS Center.
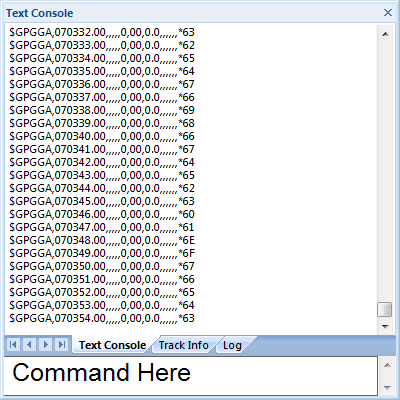
Figure 3.2[]{#_Toc519 .anchor} Command prompt and text console
3.2.1 Configure the board into base station mode
Commands for base station mode:
fix position 31.1874808 121.58111234 41.4618
log com2 rtcm1074 ontime 1
log com2 rtcm1084 ontime 1
log com2 rtcm1124 ontime 1
log com2 rtcm1005 ontime 10
saveconfig
These commands fix the coordinate of the base station and configure RTCM message to be transmitted. The coordinates are expressed in degree/meter. After each command is sent, the board will automatically acknowledge a '>OK', which means the configuration takes effect. If no acknowledge is received, please refer to 'trouble shooting' section in the user guide or contact Tersus Technical Support. If the base station coordinate is unknown, you can get it by averaging the point position solution for a while.
Table 3[]{#_Toc23631 .anchor} Common used RTCM messages
Message type Message Name
1074 Full GPS Pseudoranges and PhaseRanges plus CNR
1084 Full GLONASS Pseudoranges and PhaseRanges plus CNR
1124 Full BeiDou Pseudoranges and PhaseRanges plus CNR
1033 Receiver and Antenna Descriptors
1005 or 1006 Station Description
3.2.2 Configure the board into rover mode
Commands for rover mode:
fix none
interfacemode com2 automatic automatic on
log com1 GPGGA ontime 1
saveconfig
The rover can automatically recognize the RTCM message and compute RTK solution, so what you need is to make sure the rover position is not fixed, the serial port is in correct mode and it output RTK solution as normal.
After configuration, you can see that the board outputs empty NMEA sentences as the GNSS antenna are not connected to the board.
Details of commands and logs could be found in Log&Command Reference for Tersus BX GNSS OEM boards. (Available at www.tersus-gnss.com/document).
3.3 Data logging
Tersus GNSS Center allows user logging the raw observation, ephemeris or RTK solution to PC. The procedure of data logging is as follows:
-
Configure the board output according to your requirement with Tersus GNSS Center. (Details of commands and logs could be found in Log&Command Reference for Tersus BX GNSS OEM boards, available at www.tersus-gnss.com/document).
-
Make sure the Save Received Data option in Config window is turned on. Then go to Save Option tab to configure the save directory and log information. Tersus GNSS Center allows to save NMEA data only, binary data only and save all received data. The error messages, e.g. corrupted NMEA sentences, unrecognizable characters will be saved in log file for error diagnosis.
 Figure 3.3[]{#_Toc7507 .anchor} Save Received Data option
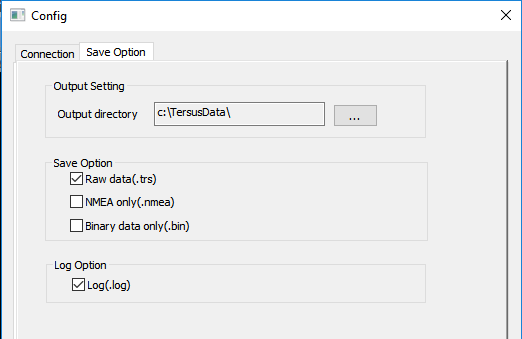 Figure 3.4[]{#_Toc7255 .anchor} Choosing saved data location
- When Tersus GNSS Center is configured well, it will log received data once the serial connection is established. Tersus GNSS Center will create a sub-directory in the output directory named with the date (in yyyymmdd format) and save the data of each connection with a single file named with the starting time (hhmmss.trs or hhmmss.nmea).
3.4 Convert Raw Data into Rinex
The receiver independent exchange format (RINEX) is commonly used in post GNSS data processing missions. Tersus GNSS Center allows user to convert the logged binary observation data into RINEX3.02/3.04 or RINEX2.10 format. Here is guidance for the conversion:
-
Select Tools -> RINEX Converter to initiate the Tersus RINEX Converter.
-
Click [Open] to select the logged binary observation file. An alternative way is drag the file onto the text box. The output RINEX file will be stored in the same directory as the binary file. You can also change it by click [Save as]. Please note that the output RINEX file name is the same as the binary file as well by default.
-
Choose the source format according to your board/receiver type. It also supports converting RTCM3.2 messages into RINEX as well, but an approximate UTC time of start logging need to be provided.
-
A Station Name should be extracted from the source file before the conversion. If the Time Interval option is ticked, the converter also allows to downsampling the observation data.
-
Click Process and the RINEX files will be found in the folder of Save Path. There are four kinds of RINEX files, including:
-
.yyo file -- observation file
-
.yyn file -- GPS ephemeris file
-
.yyg file -- GLONASS ephemeris file
-
.yyc file -- Beidou ephemeris file
-
.yyl file -- Galileo ephemeris file
-
.yyp file -- All ephemeris file
Note: *yy in file extension is two digits of year.
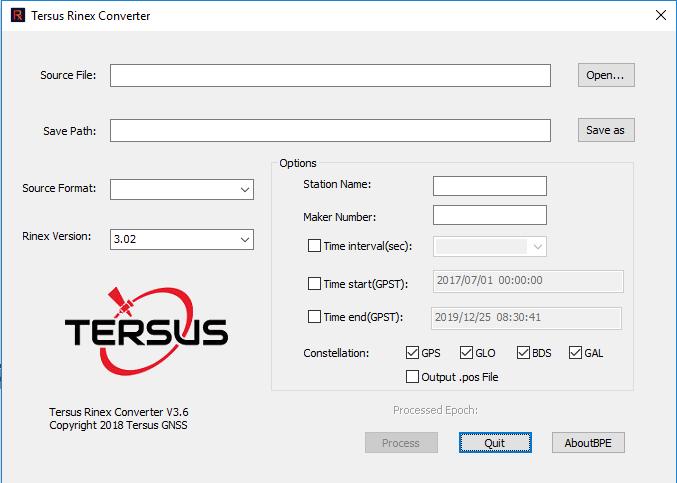
Figure 3.5[]{#_Toc14867 .anchor} Converting data